The Milky Way
Contents:
1. Looking Down at the Milky Way 2. A Critique 3. Milky Way Gallery 4. The Cloudy Nights 5. The Technical Side 6. A Second Critique
1. Looking down at the Milky Way

A friend challenged me to look at the night sky differently. He suggested that some night when the sky was clear to go out and observe. Find a spot where you can see as much of the sky as possible, then lie flat on the ground—use a blanket perhaps to guard against ticks—and feel the Earth at your back. Look up at the sky, the stars, the Milky Way. Get comfortable, take a deep breath, then change your perspective. Consider that you’re lying on a very large sphere. The whole Earth is behind you, think about that, the whole Earth is behind you. Now look at the Milky Way, look towards the galactic center near Sagittarius and consider that you’re not looking up at it, but looking down into it. You are on a giant sphere that revolves around a star that revolves around that galactic center. If the Sun suddenly stopped revolving around the galaxy—don’t worry, it won’t do that—the immense gravity of the galactic core would pull us in, we would fall down into the Milky Way’s core. Let go of the ego-centric perspective and look down into that core. Suddenly, the universe gets a whole lot bigger and you are in a unique position, you are exactly between the solid surface of Earth and the greater cosmos. Hold that feeling and see where it takes you.
JT Meader, July 2020

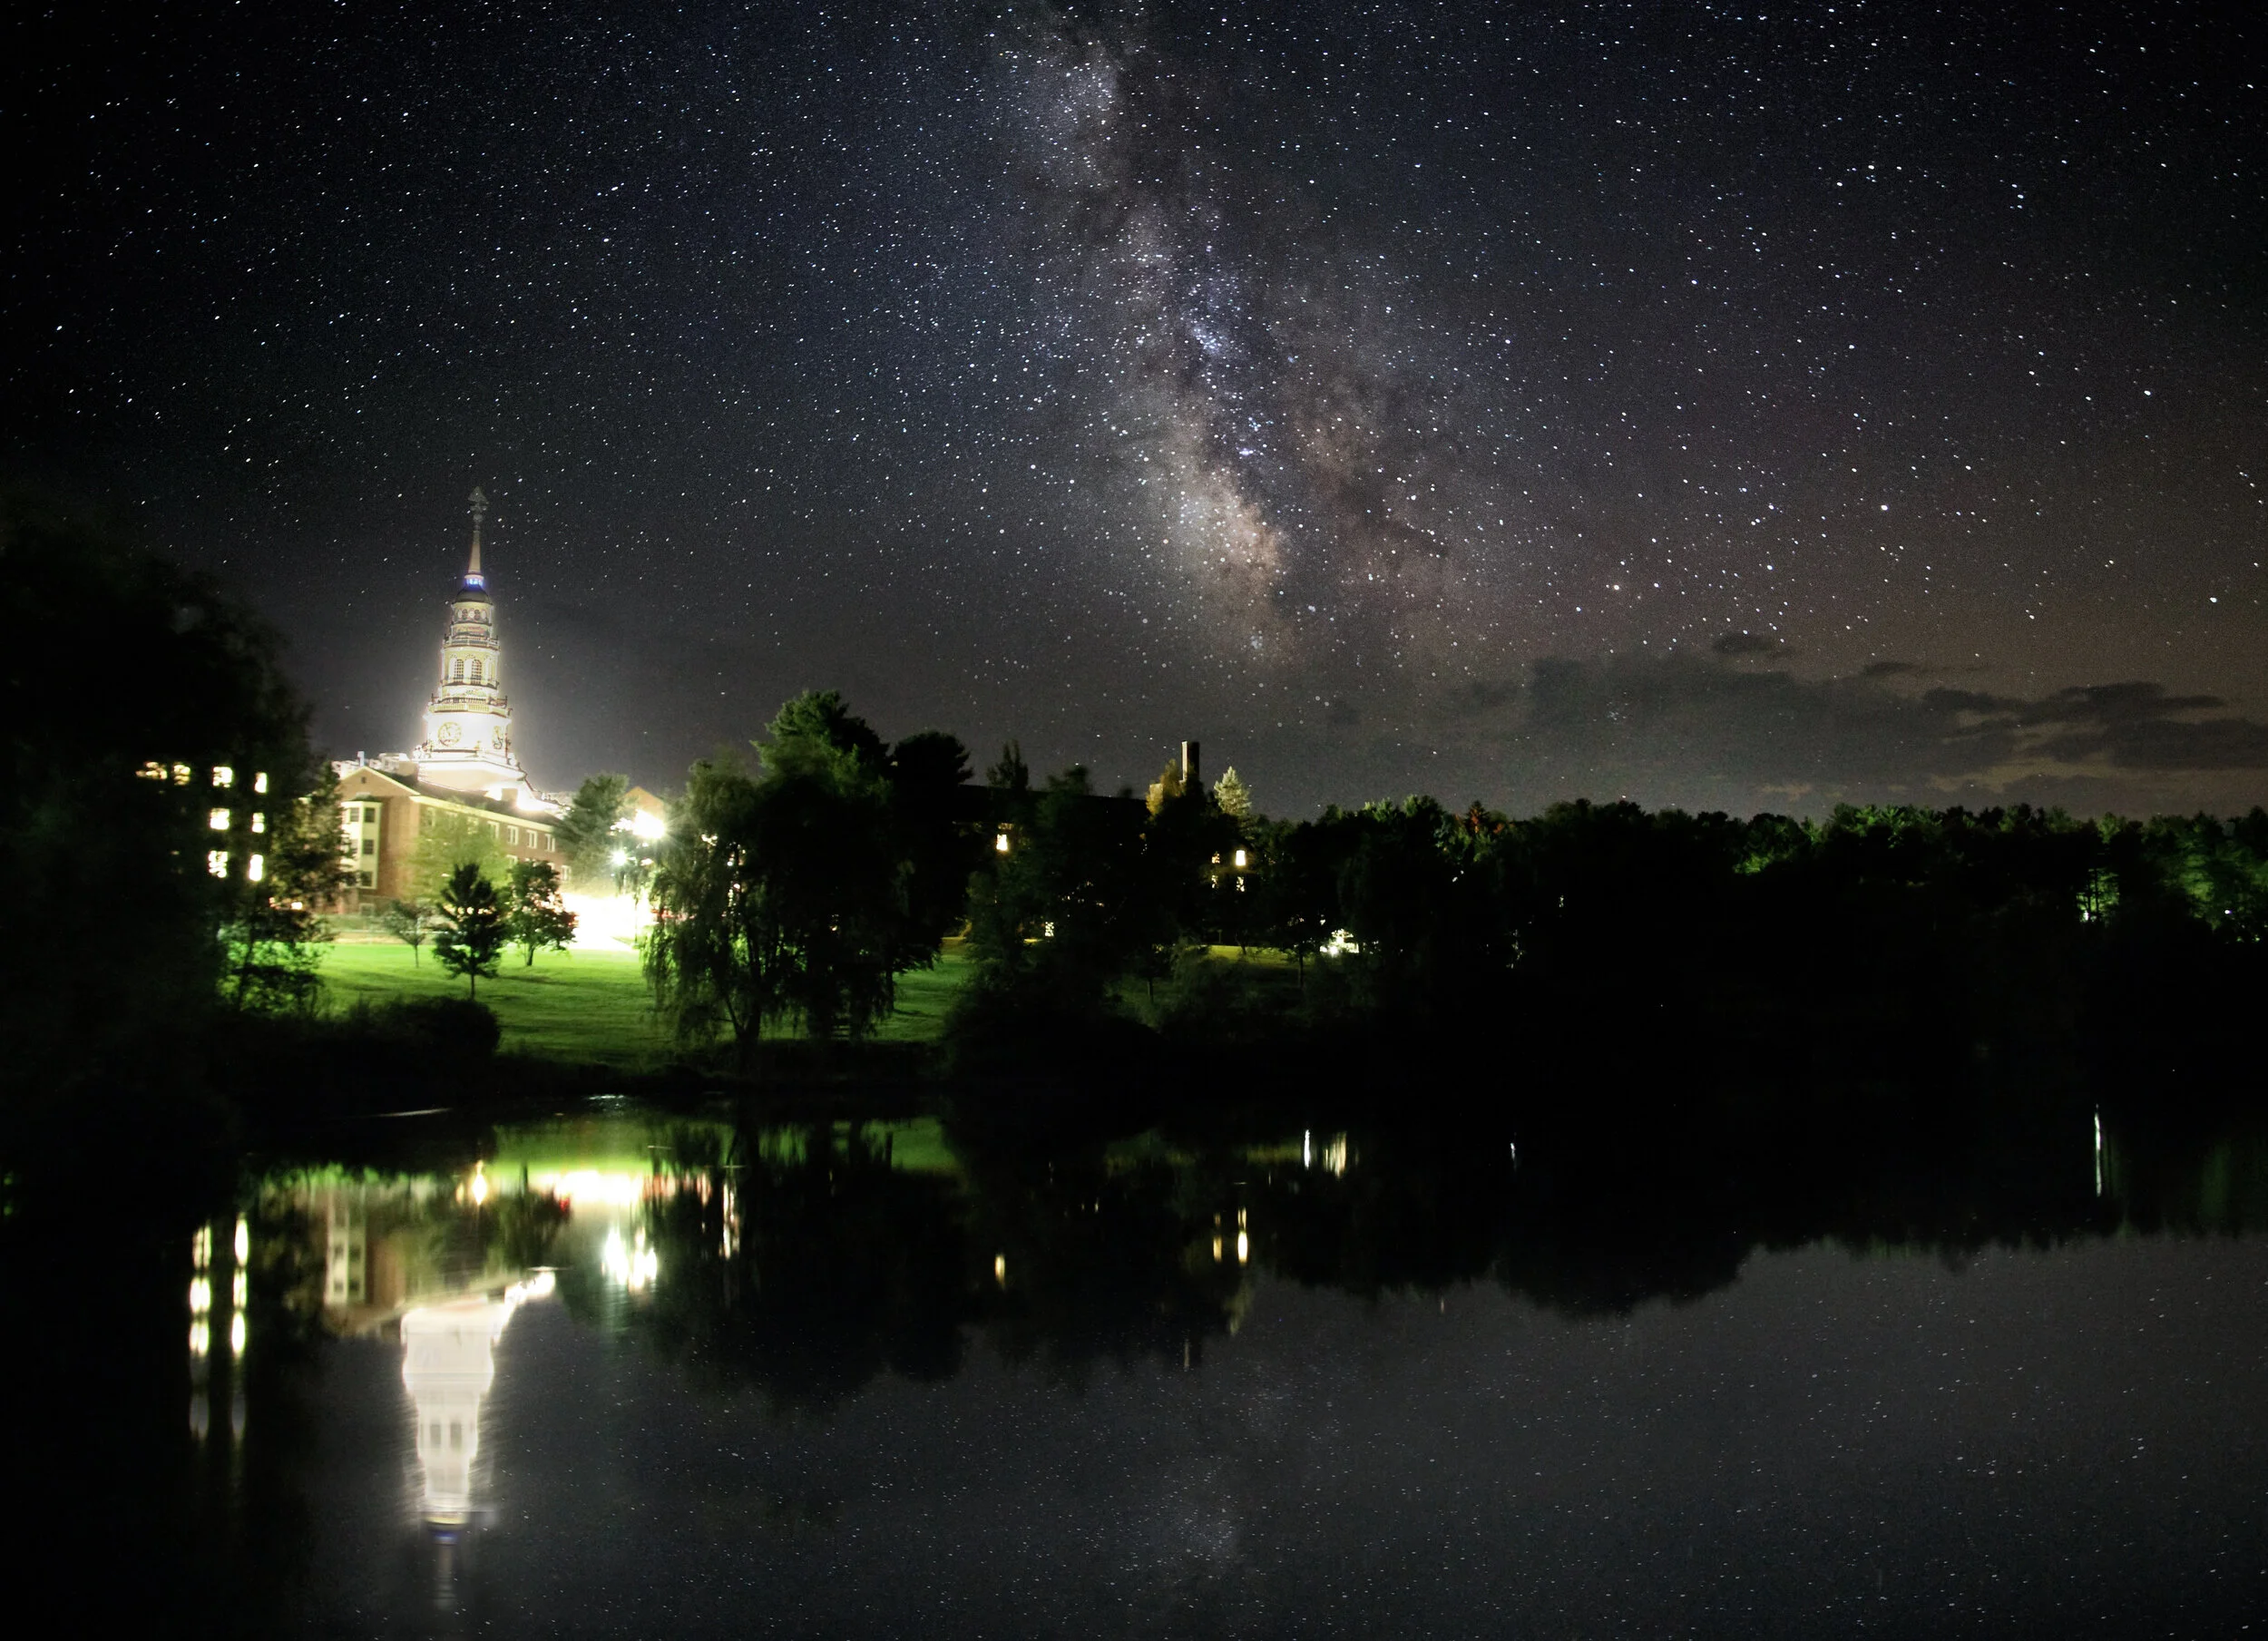
2. A Critique: My First Milky Way Shot
August 5, 2013
This was my first attempt at shooting the Milky Way. I look at it now and I had a few things right. I like the composition idea, Miller Tower on the left, Johnson Pond at the bottom for a reflection, and the Milky Way on the right. Good idea. A few problems, number one is the amount of light pollution, both the light from the library tower and the distant lights of Waterville seen over the horizon. I was fortunate that the Milky Way even showed up at all. The tower and its reflection need a much faster shutter speed to make them look like they do to the eye, they’re both washed out. The tower’s reflection is cropped off, and it would have been nice to capture a reflection of the Milky Way too, though the light pollution would probably hinder that.
If I were going to attempt this shot again, and I might, I would shoot two exposures, one for the foreground—the library and the lawn, and one for the sky. The light pollution hasn’t changed, but shooting on a clear night with lower humidity would help a lot. Also this was shot with an 18mm lens, a wider field such as a 14mm would include more sky and therefore more Milky Way. It would also capture the full reflection of Miller Tower better. It takes practice. Practice, practice, practice.
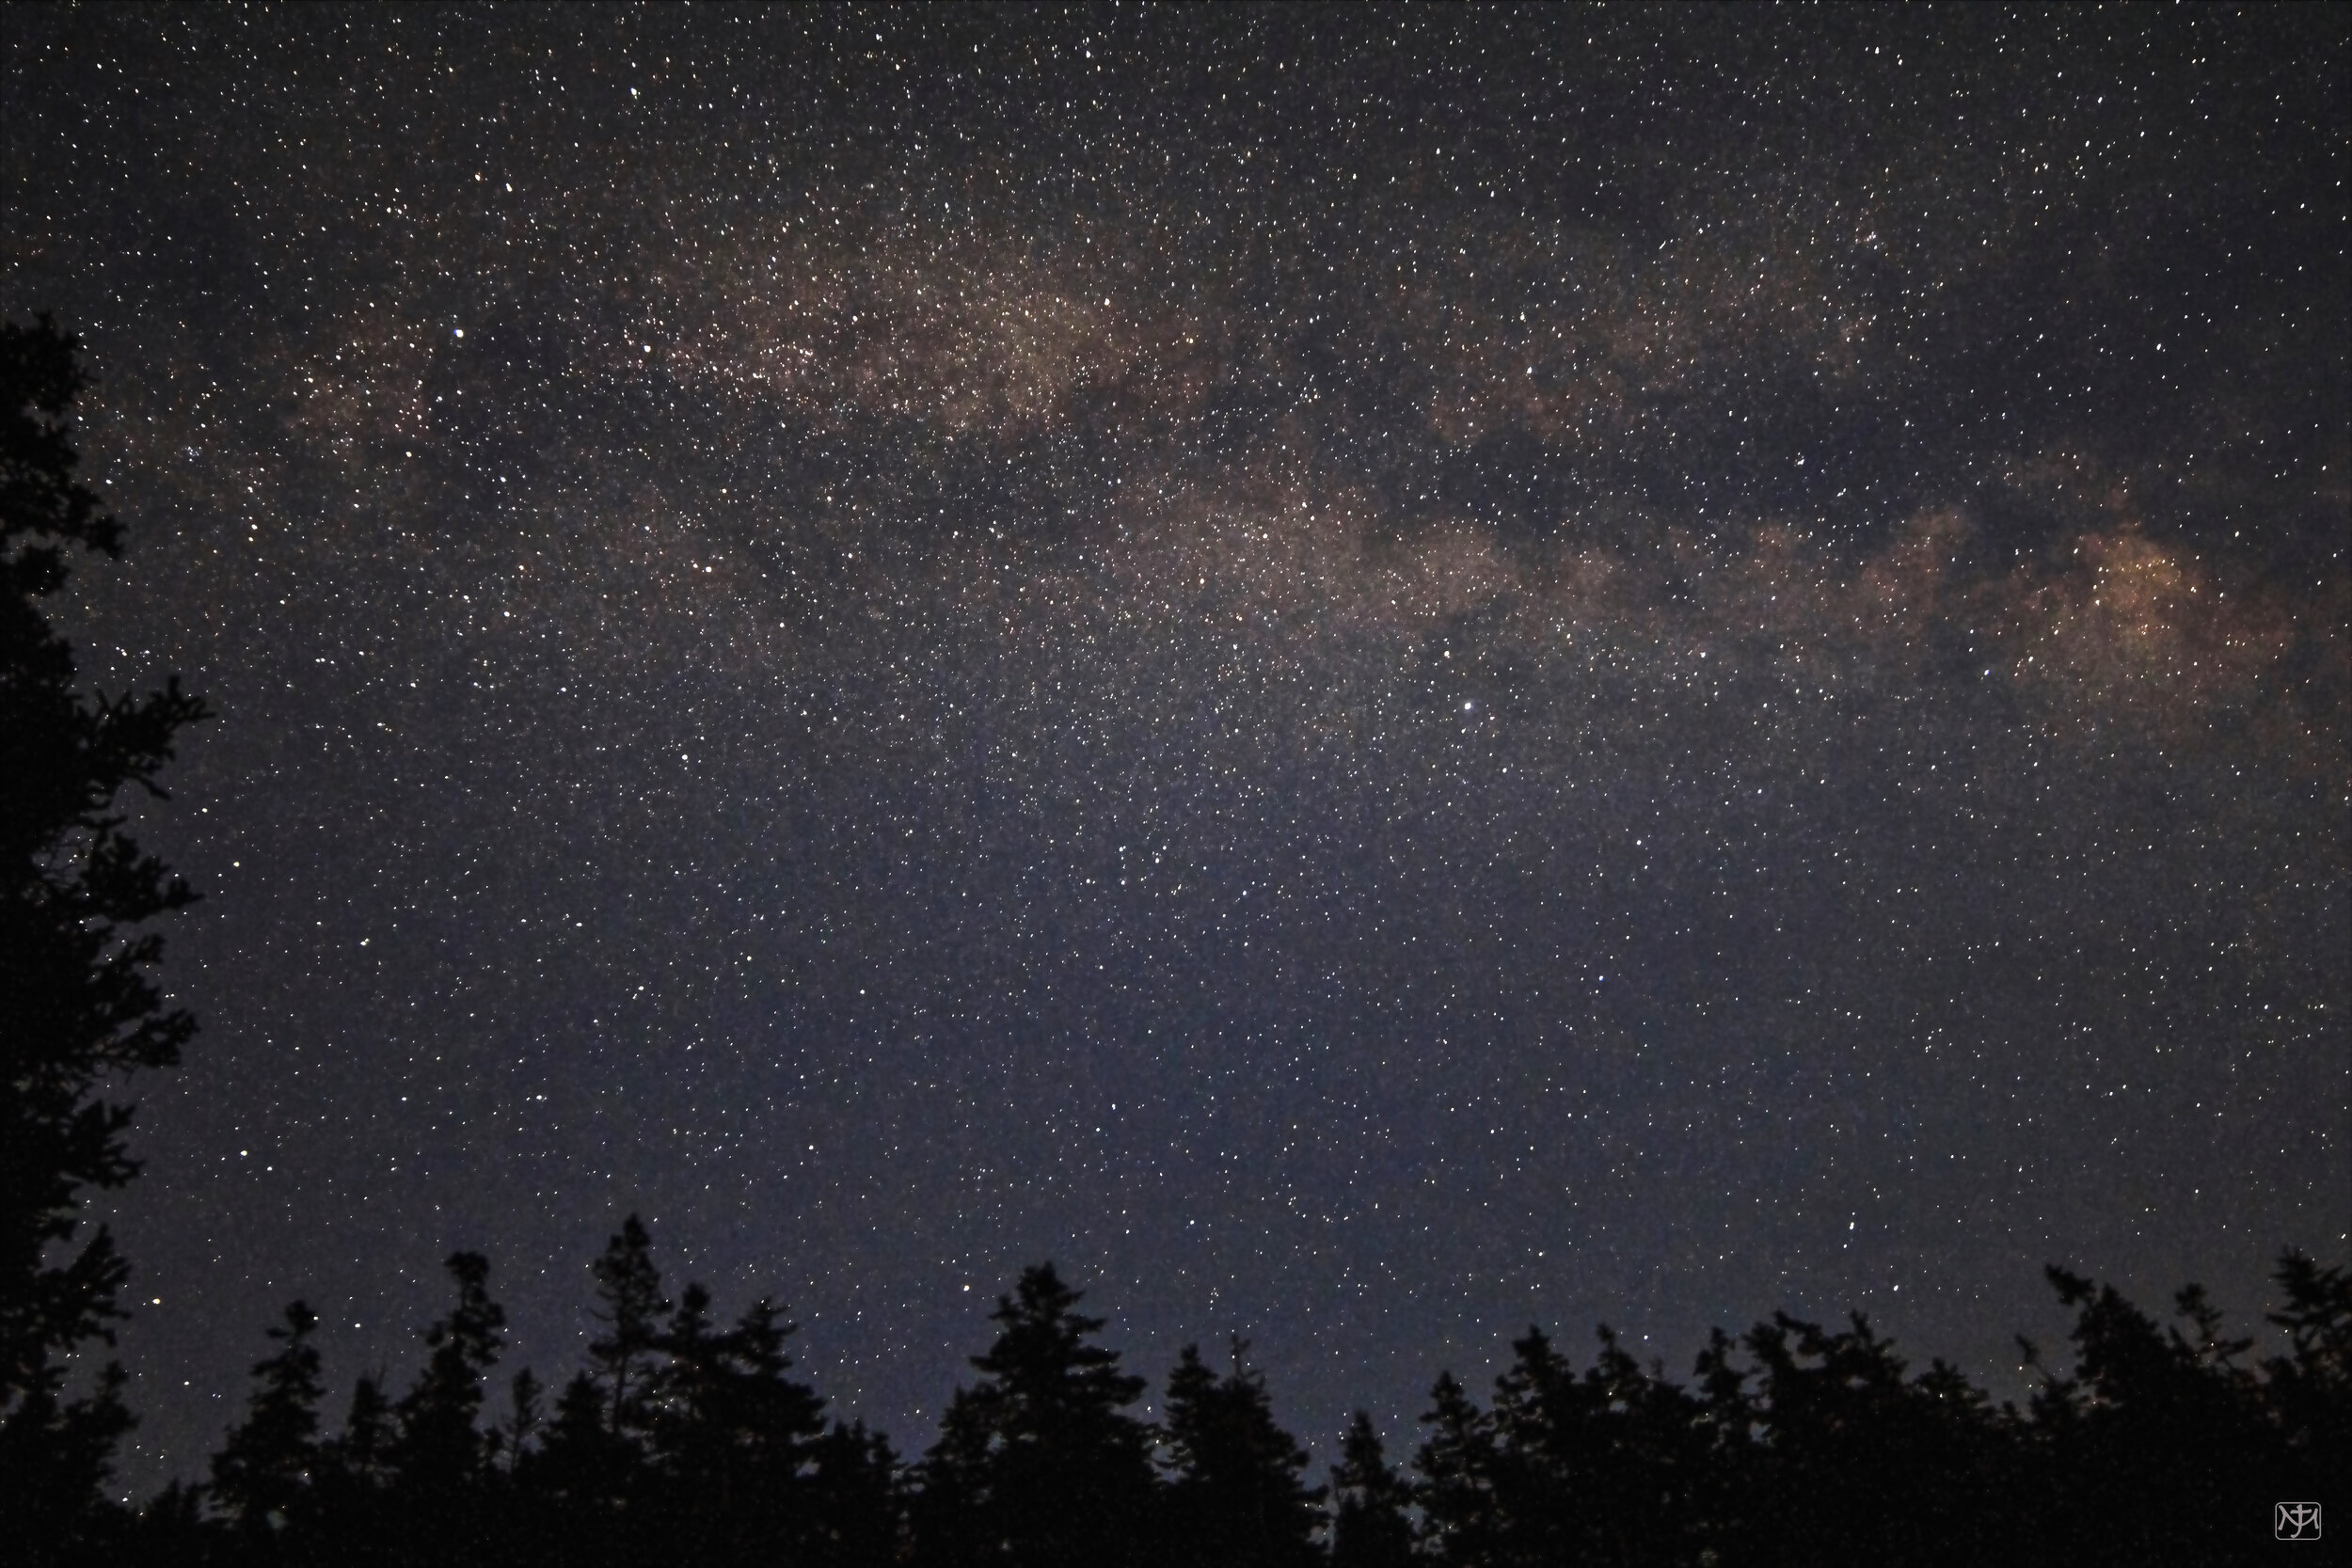
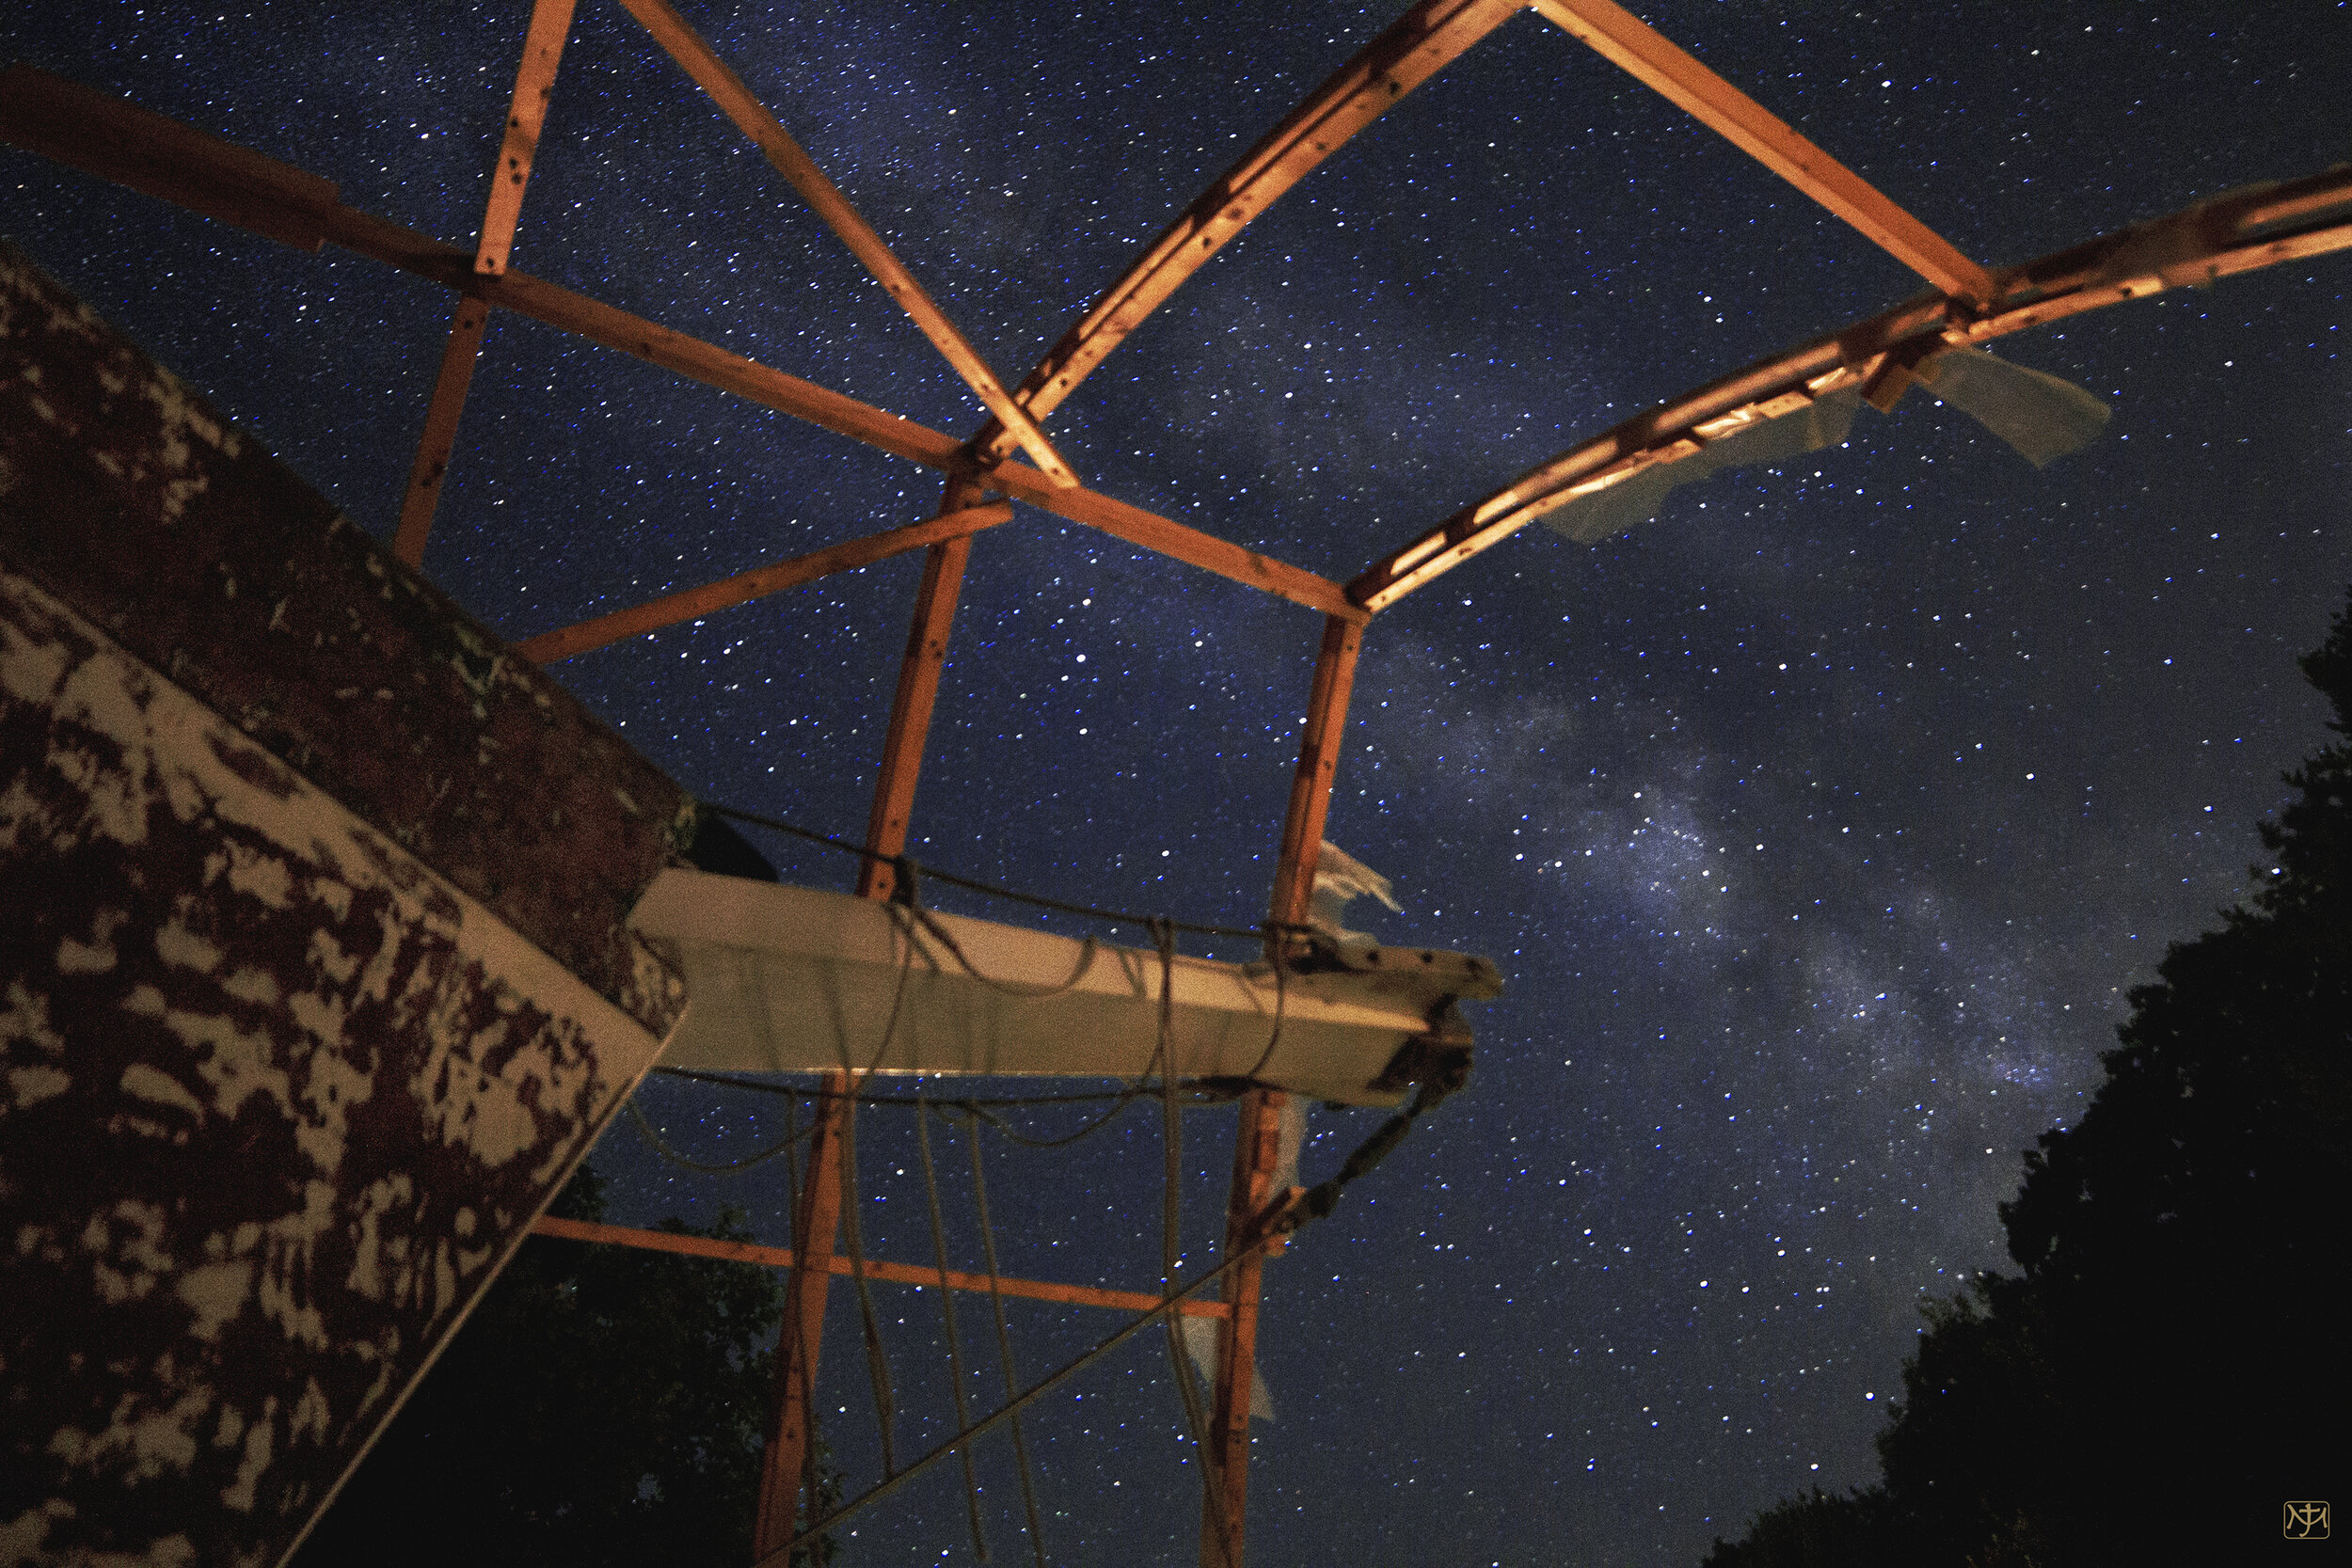
3. Milky Way Gallery
These images of the Milky Way were taken over the course of the last six years (2014-2020) from numerous locations. To get a killer Milky Way shot there are a few hoops to jump through. It requires a clear night with good seeing, good transparency, and a location away from light pollution. The night should be free of the Moon and its accompanying glare as well. Given that all those forces come together for you, the real clincher to a great Milky Way photograph is an interesting foreground, and that often requires traveling somewhere in the middle of the night, wandering down trails and lugging all the necessary gear in the dark. In the end, despite all the variables that can turn it sour, shooting the Milky Way is one of the most rewarding things you can do with a camera. It puts you in a beautiful spot, often with one or two good friends, in the middle of the night, and pretty much all to yourselves. Just you, your friends, and the stars, in the context of the creative challenge to make something of the situation. There lies the crux of it all. It doesn’t get much better than that.
Click photo to fully enlarge, many of these thumbnail images are cropped. If the image is labelled composite, it was created using shots taken at different times, then combined.

Whitehead Island Light Station and Milky Way, © John Meader, 2022.
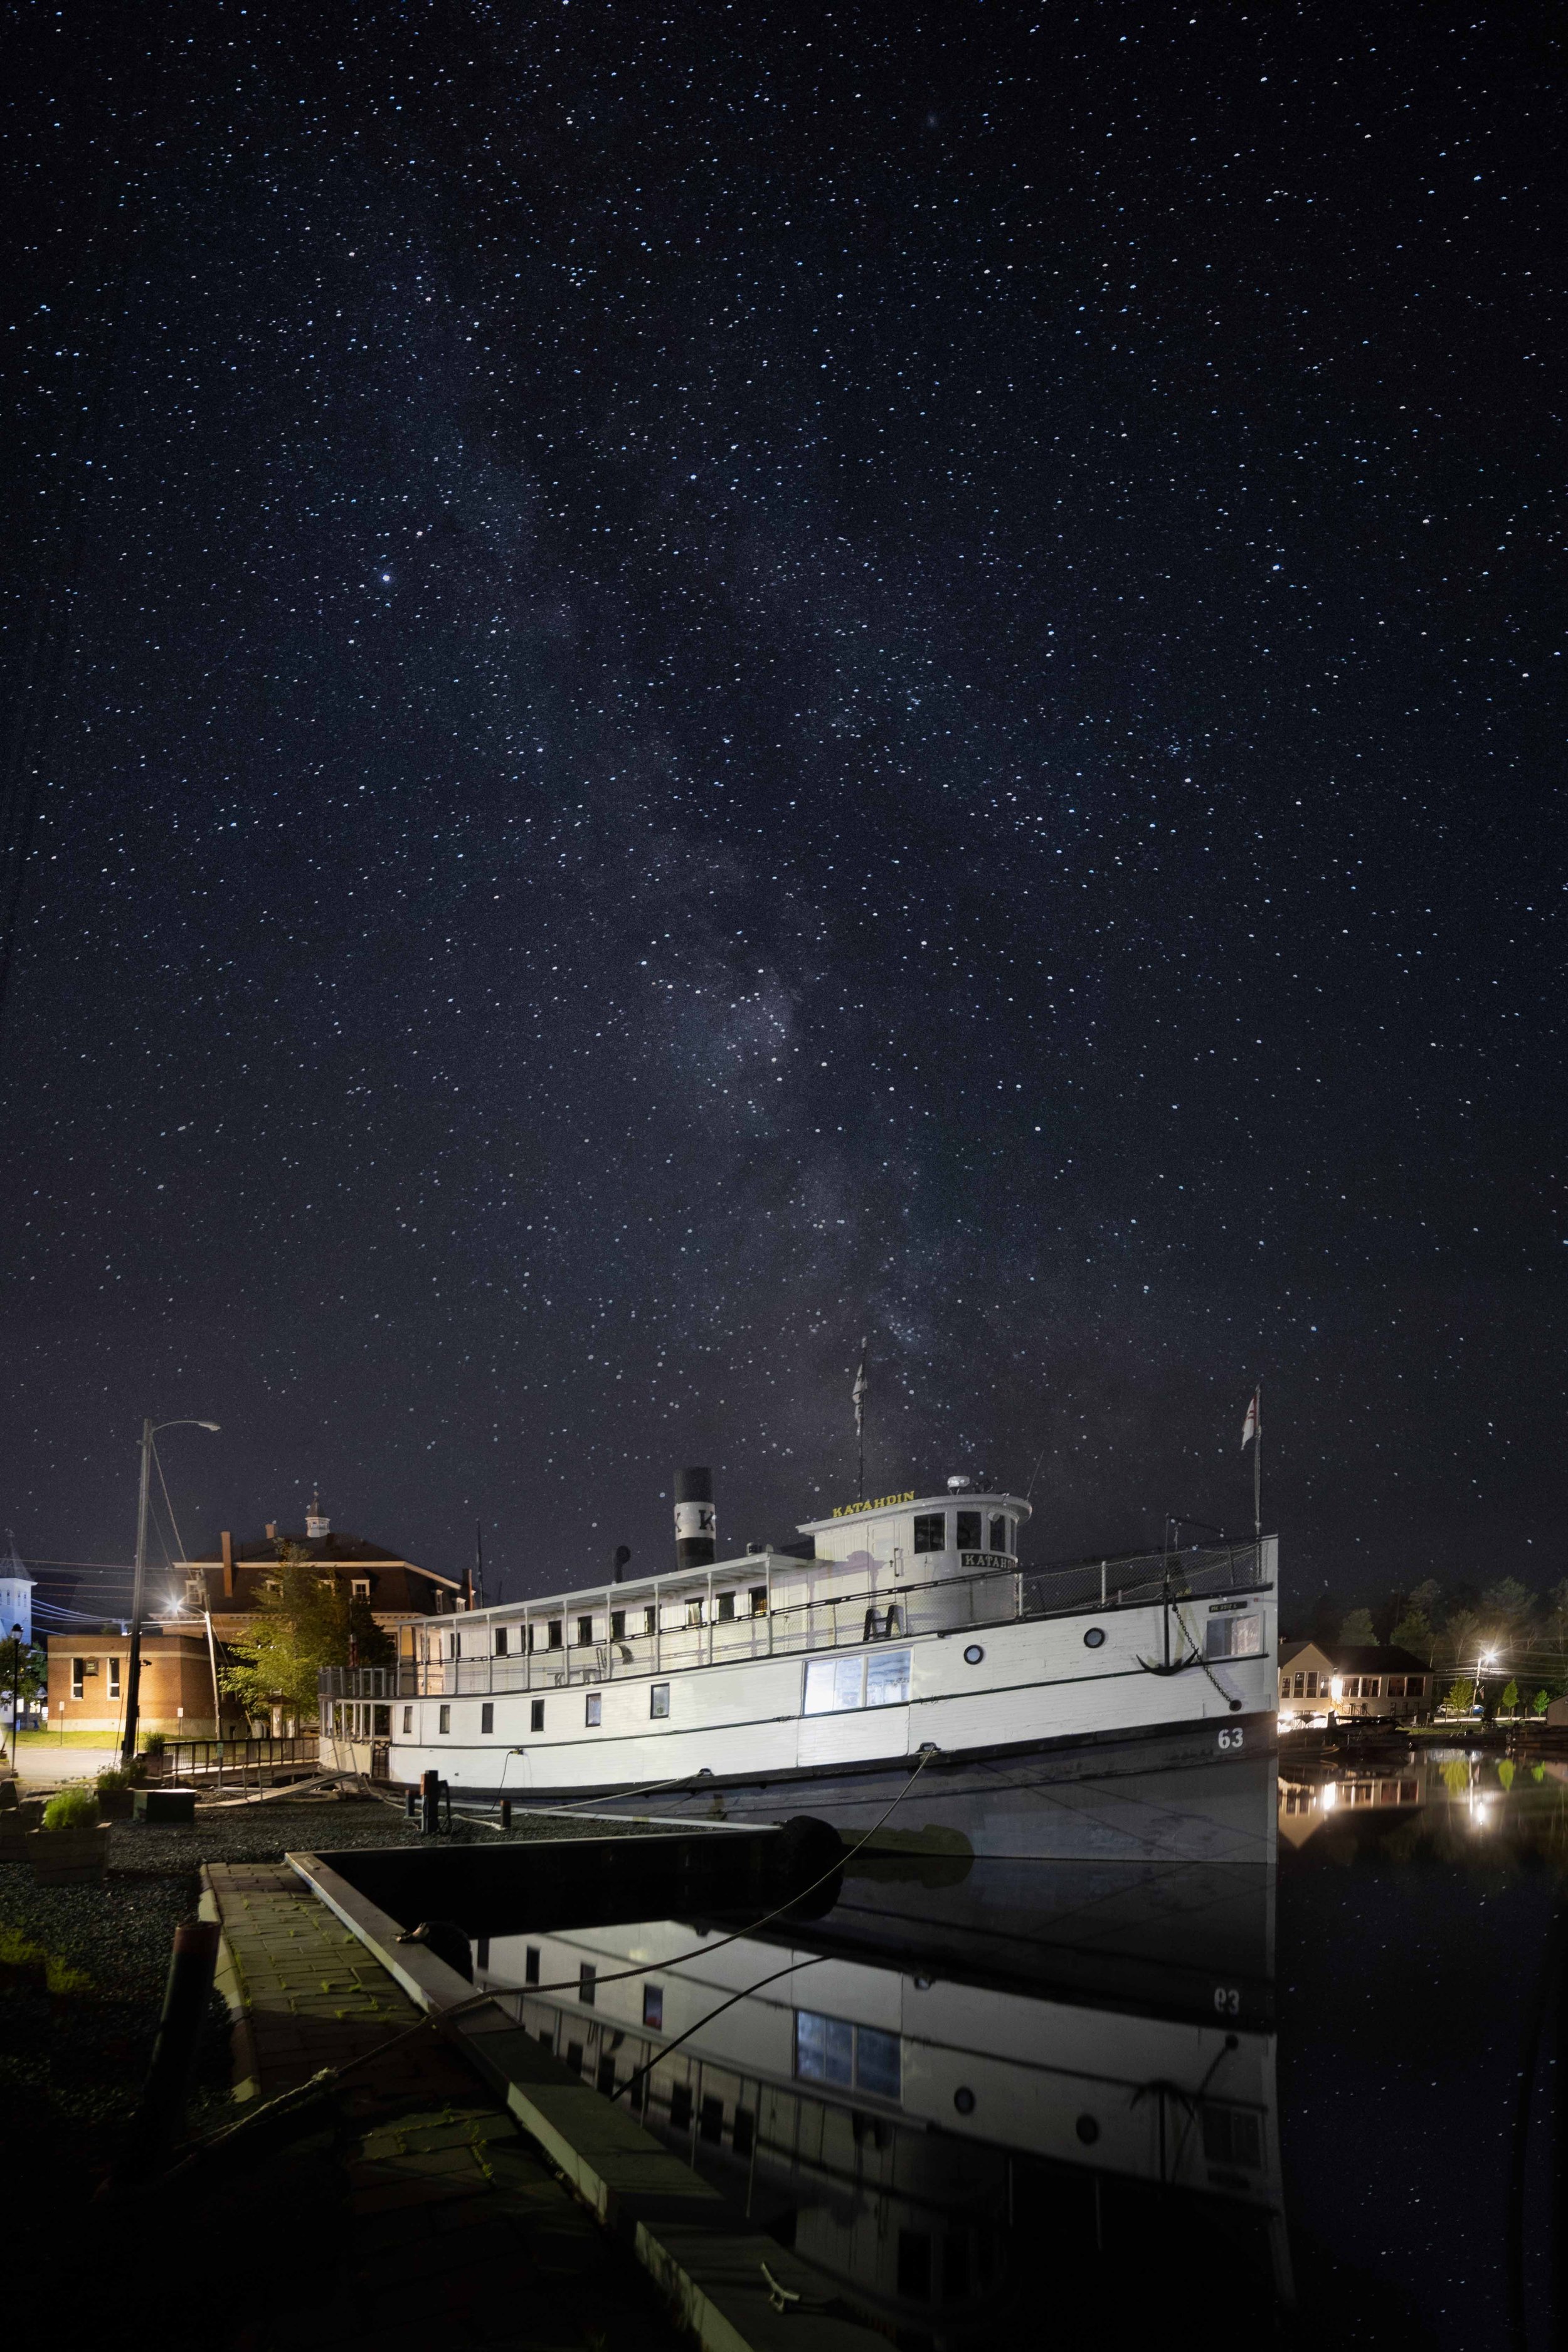
Steamer Katahdin, Greenville, Maine, © John Meader, 2022
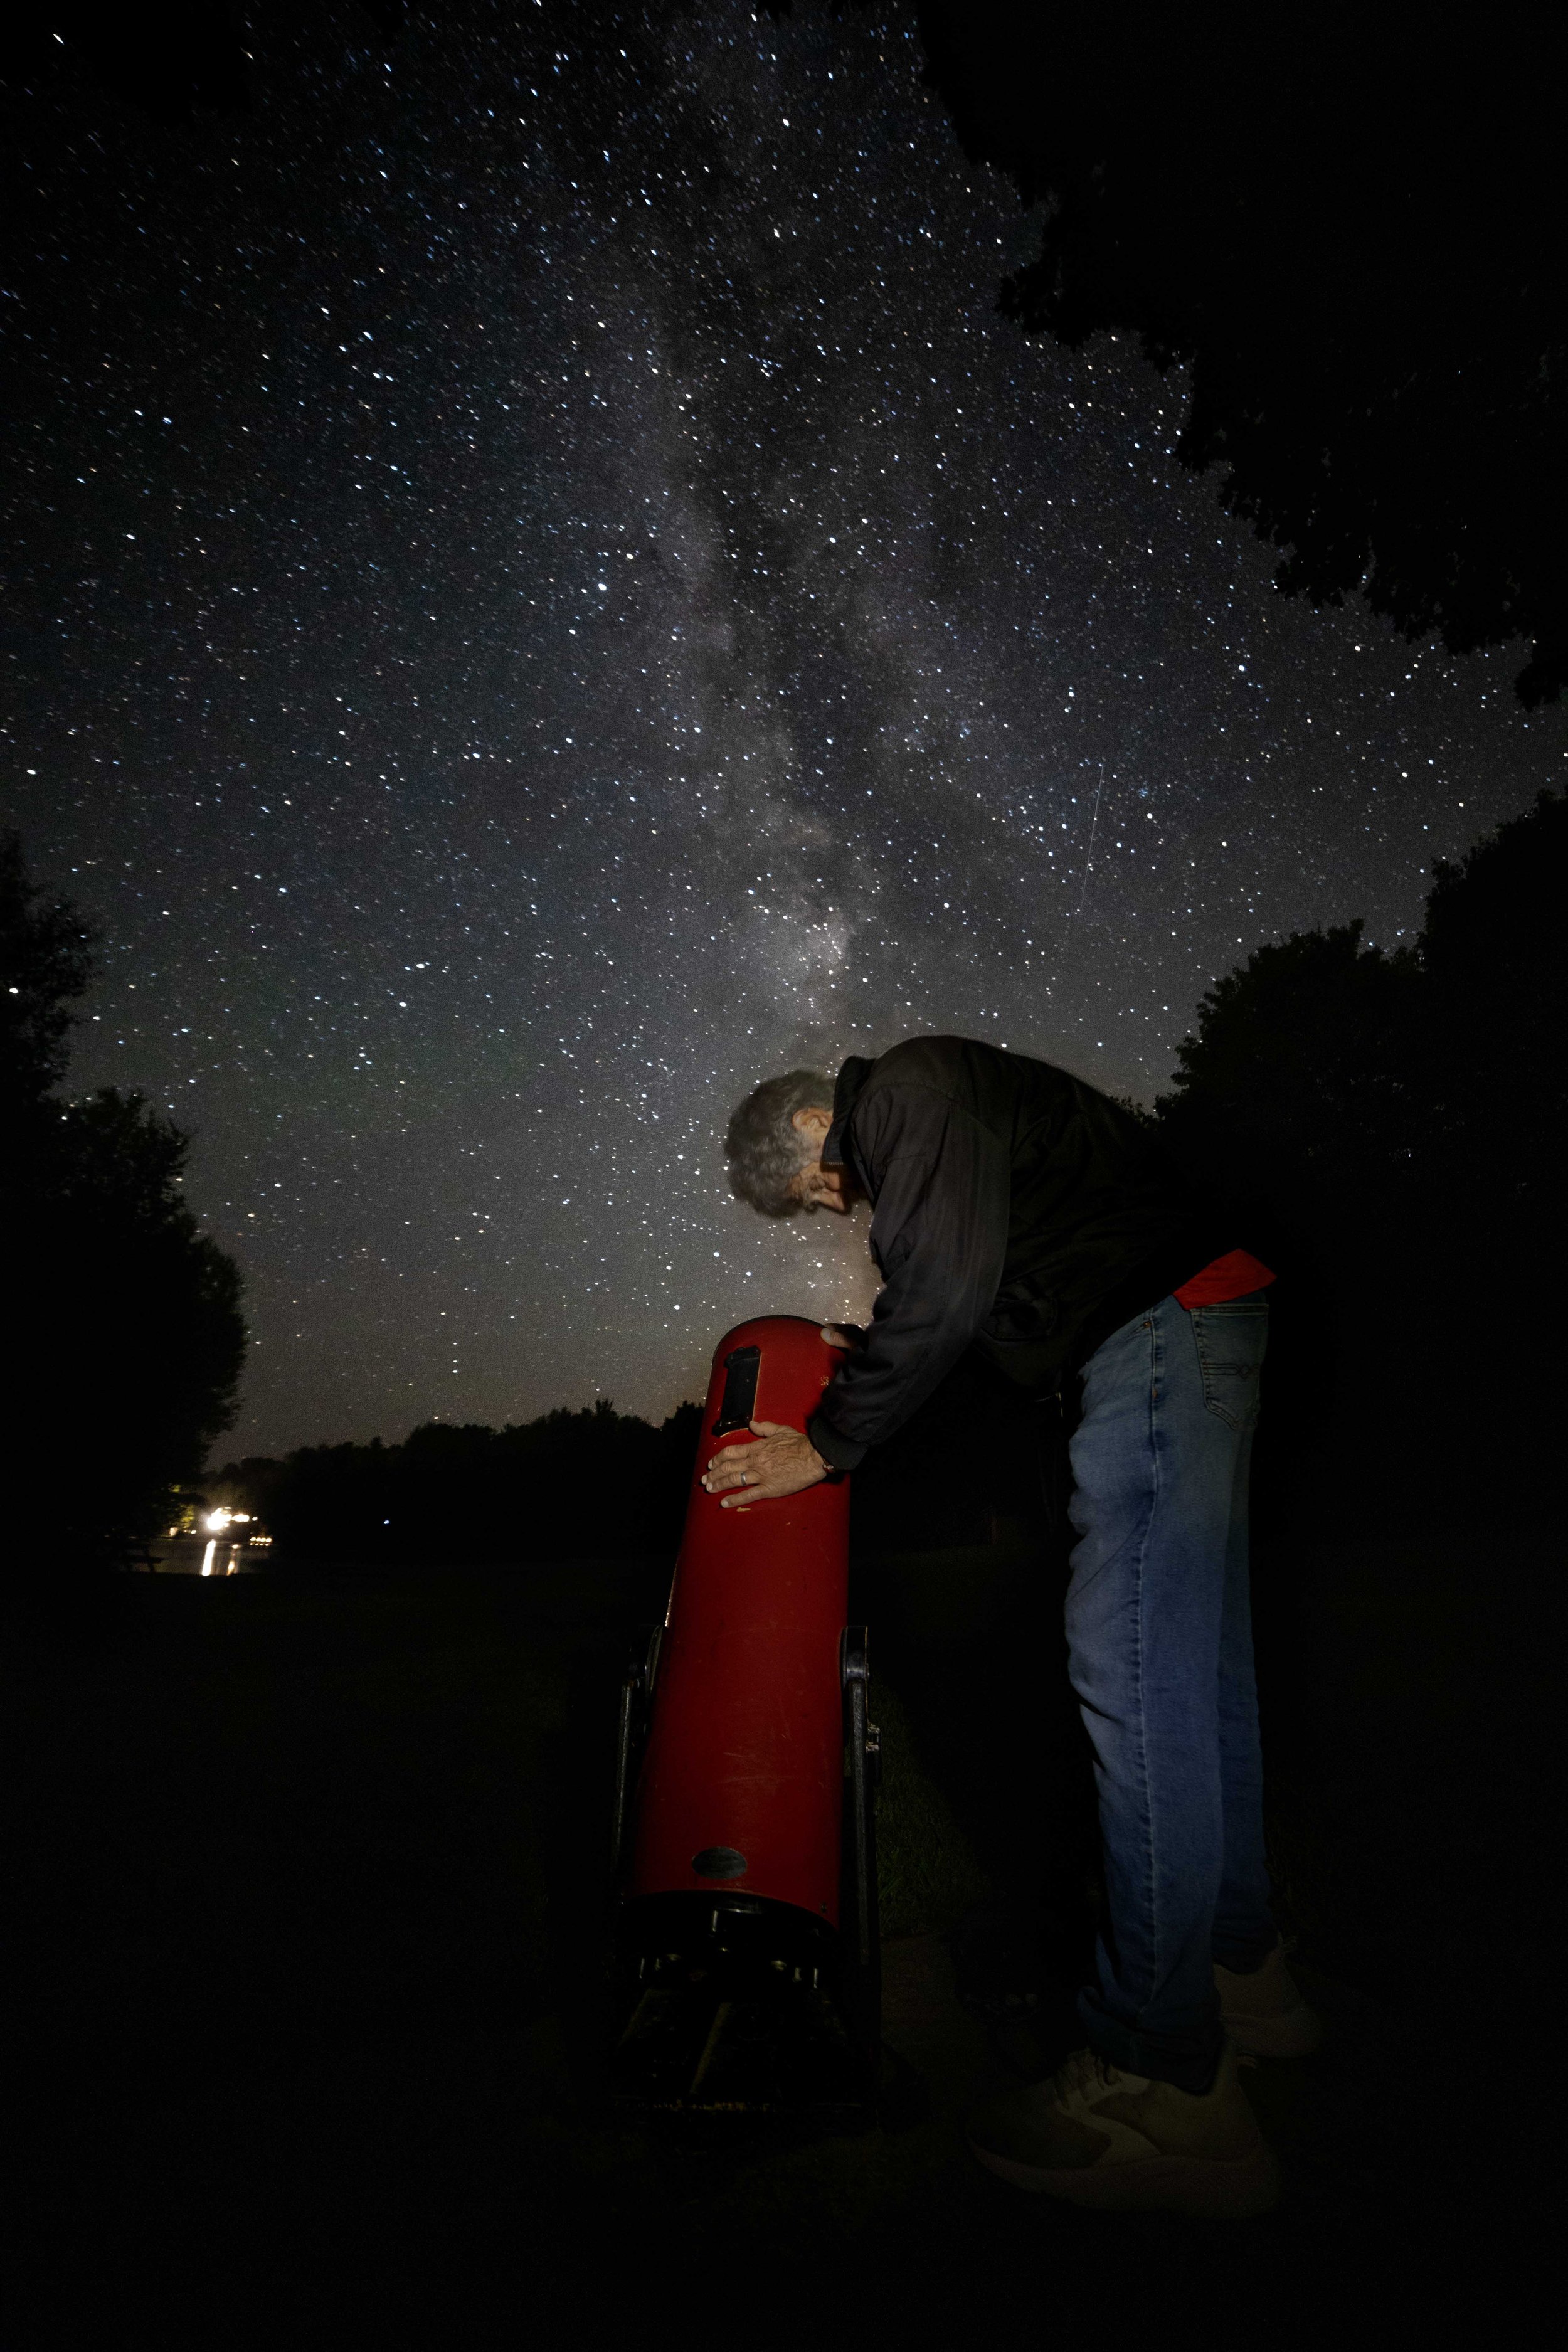
Larry's Telescope, © John Meader, 2022
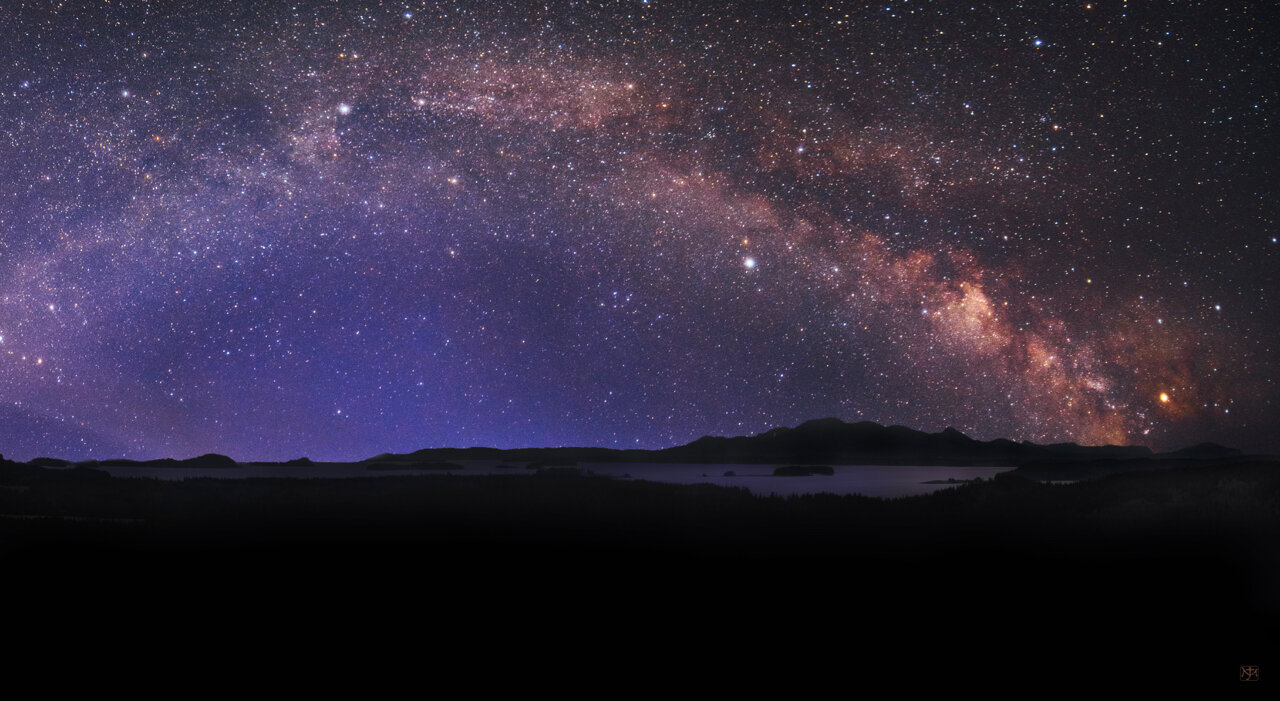
Arch of the Night (a composite), © John Meader, 2020

Starlit Paddle, (A composite, one of the canoeist taken at twilight, and a second taken 2 hours later for the stars) © John Meader, 2019

Osprey, Mars and the Milky Way, © John Meader, 2018

Wire Bridge #1, © John Meader, 2019

Wire Bridge #2, © John Meader, 2019

Wire Bridge #3, © John Meader, 2019

Crossing the River, © John Meader, 2019

Raven's Nest, © John Meader, 2014

Stellafane 2016, © John Meader, 2016

Meteor Over Parker Pond, © John Meader, 2019

Parker Pond on a Summer Night, © John Meader, 2019

Looking north at Whittier Pond, © John Meader, 2019

Stars Over Katahdin, © John Meader, 2017

Bonfire at Flagstaff, © John Meader, 2014

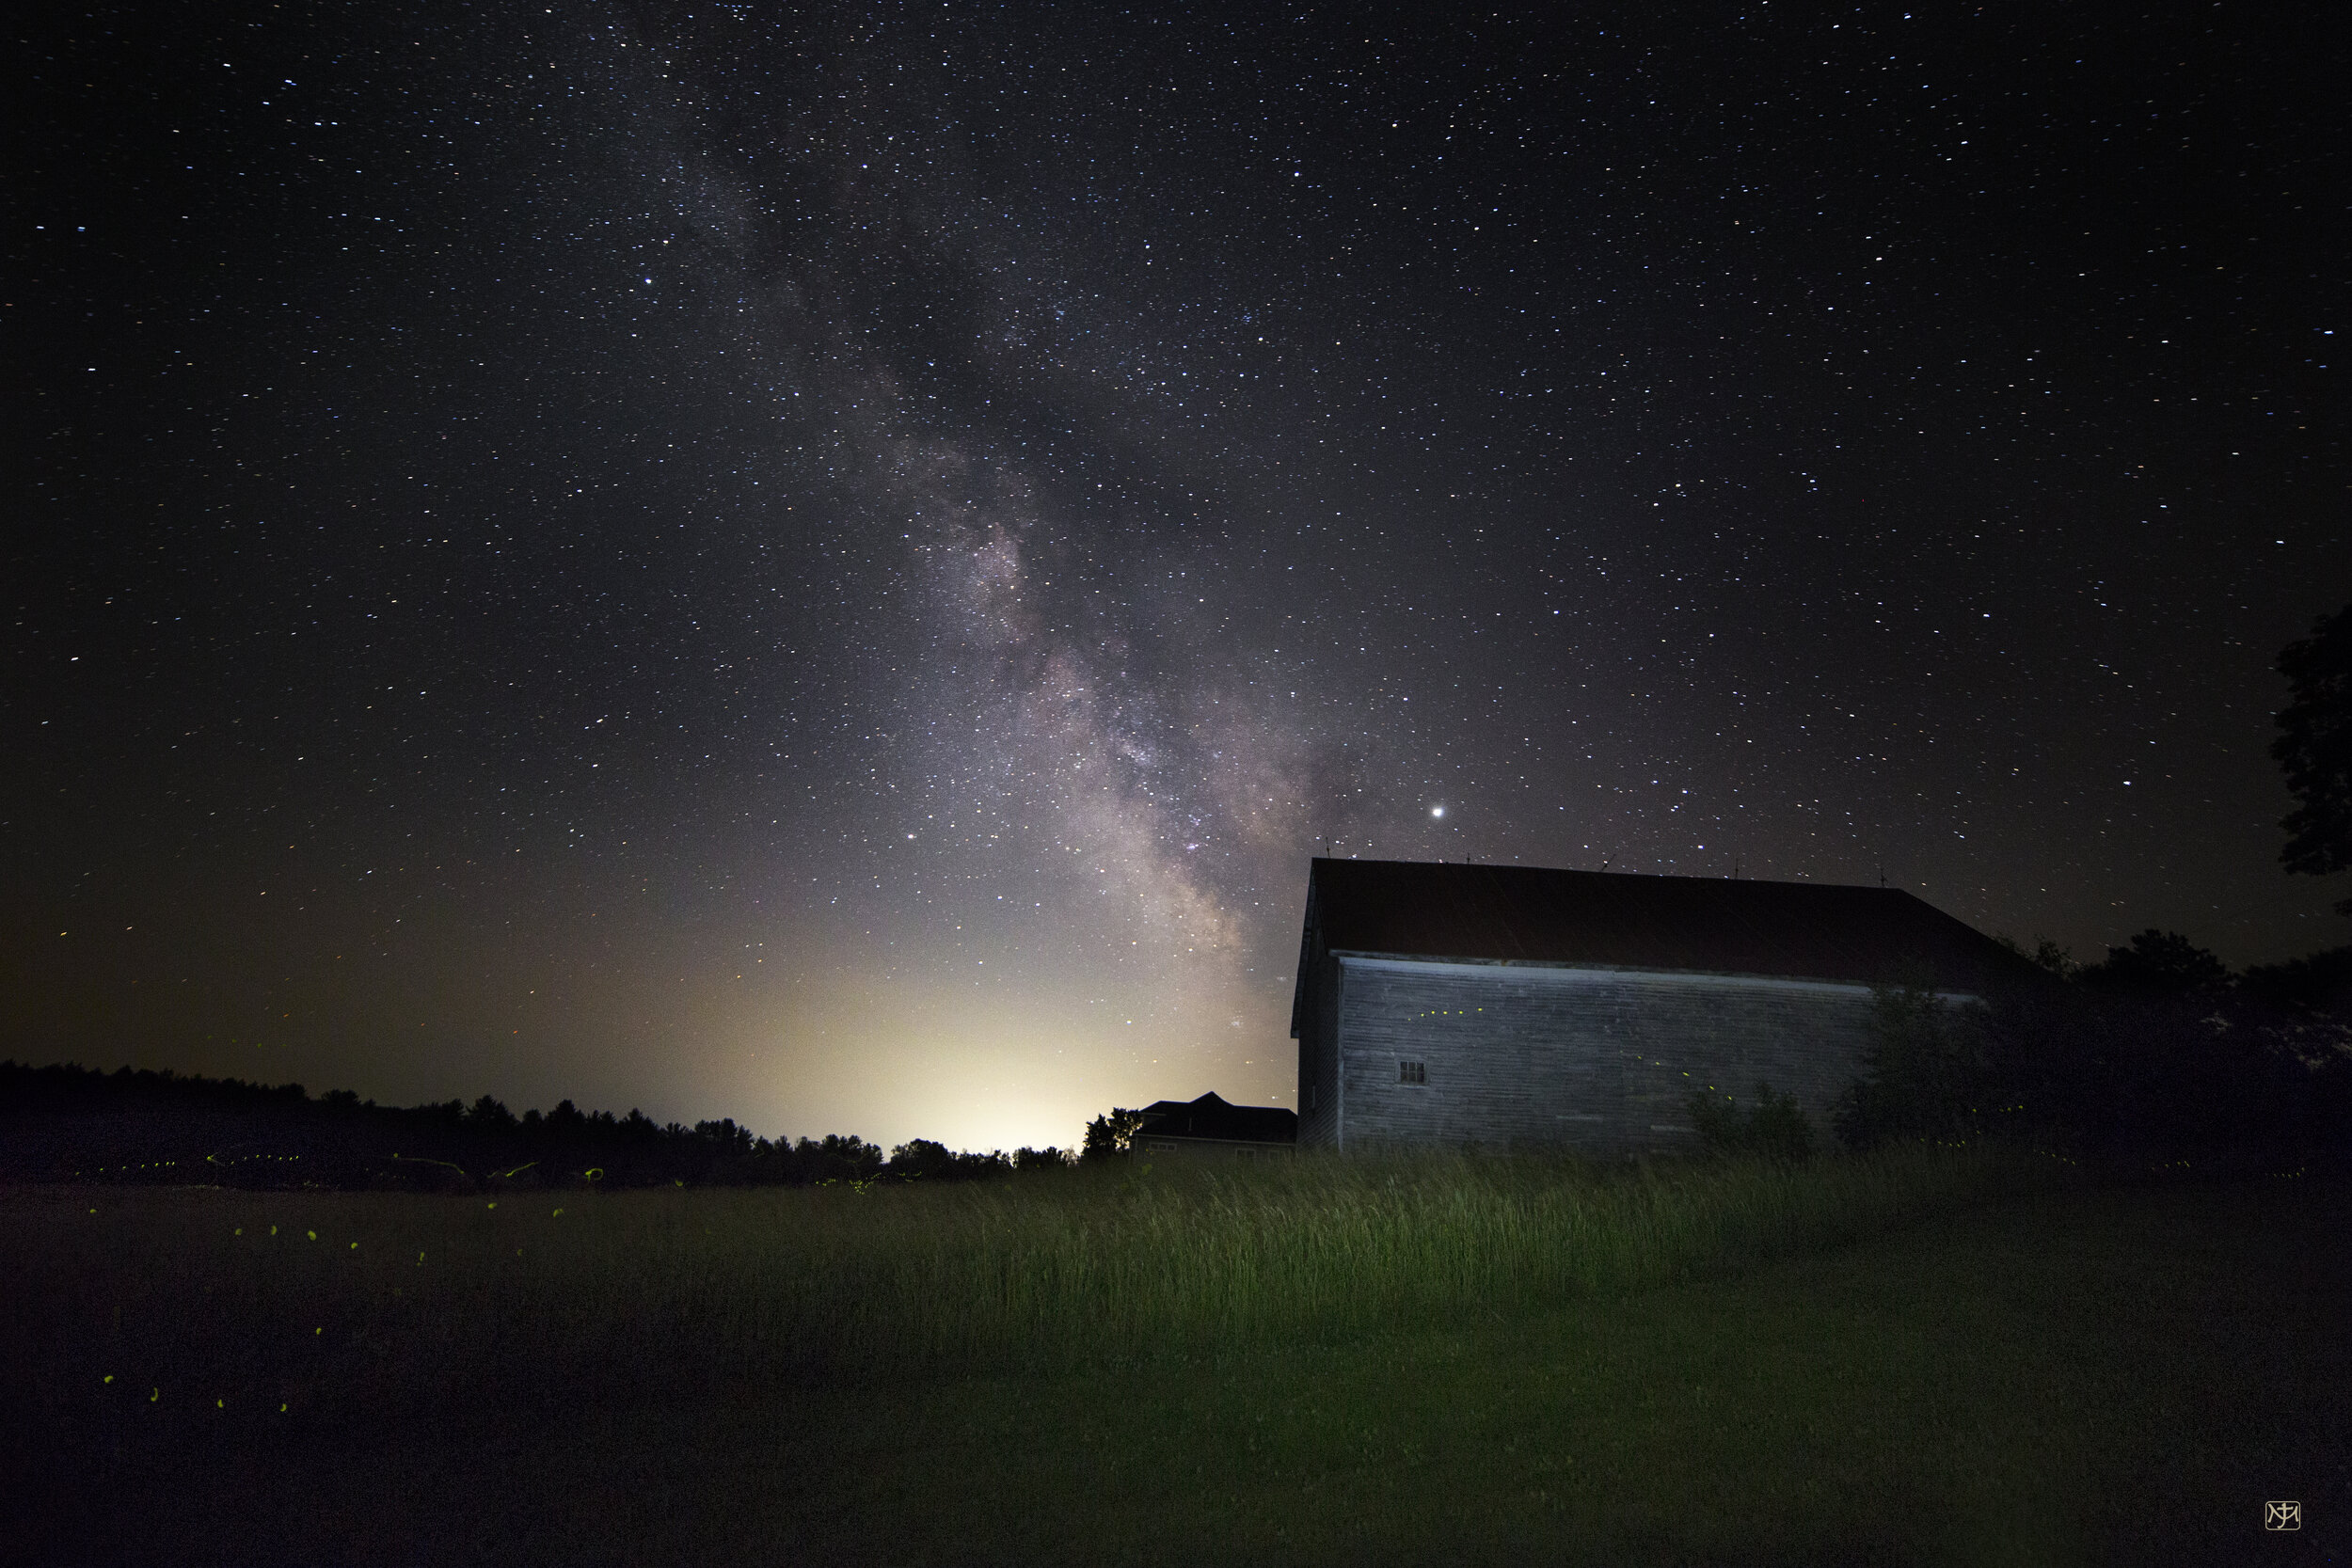
Foss Hill Farm, Albion, Maine, © John Meader, 2021

China Lake Panorama, © John Meader, 2016

River Ice, © John Meader, 2015

Dancing with the Stars (A composite, one for the scene, one for the dancer and her reflection), © John Meader, 2018

Low's Bridge, © John Meader, 2021

Pemaquid Light, © John Meader, 2015

Pemaquid Ledges and the Milky Way, © John Meader, 2015

Flagstaff Evening, © John Meader, 2017
Picnic with the Galaxy, © John Meader, 2015

Long Lake with Elise, © John Meader, 2019
Fireflies, © John Meader, 2019

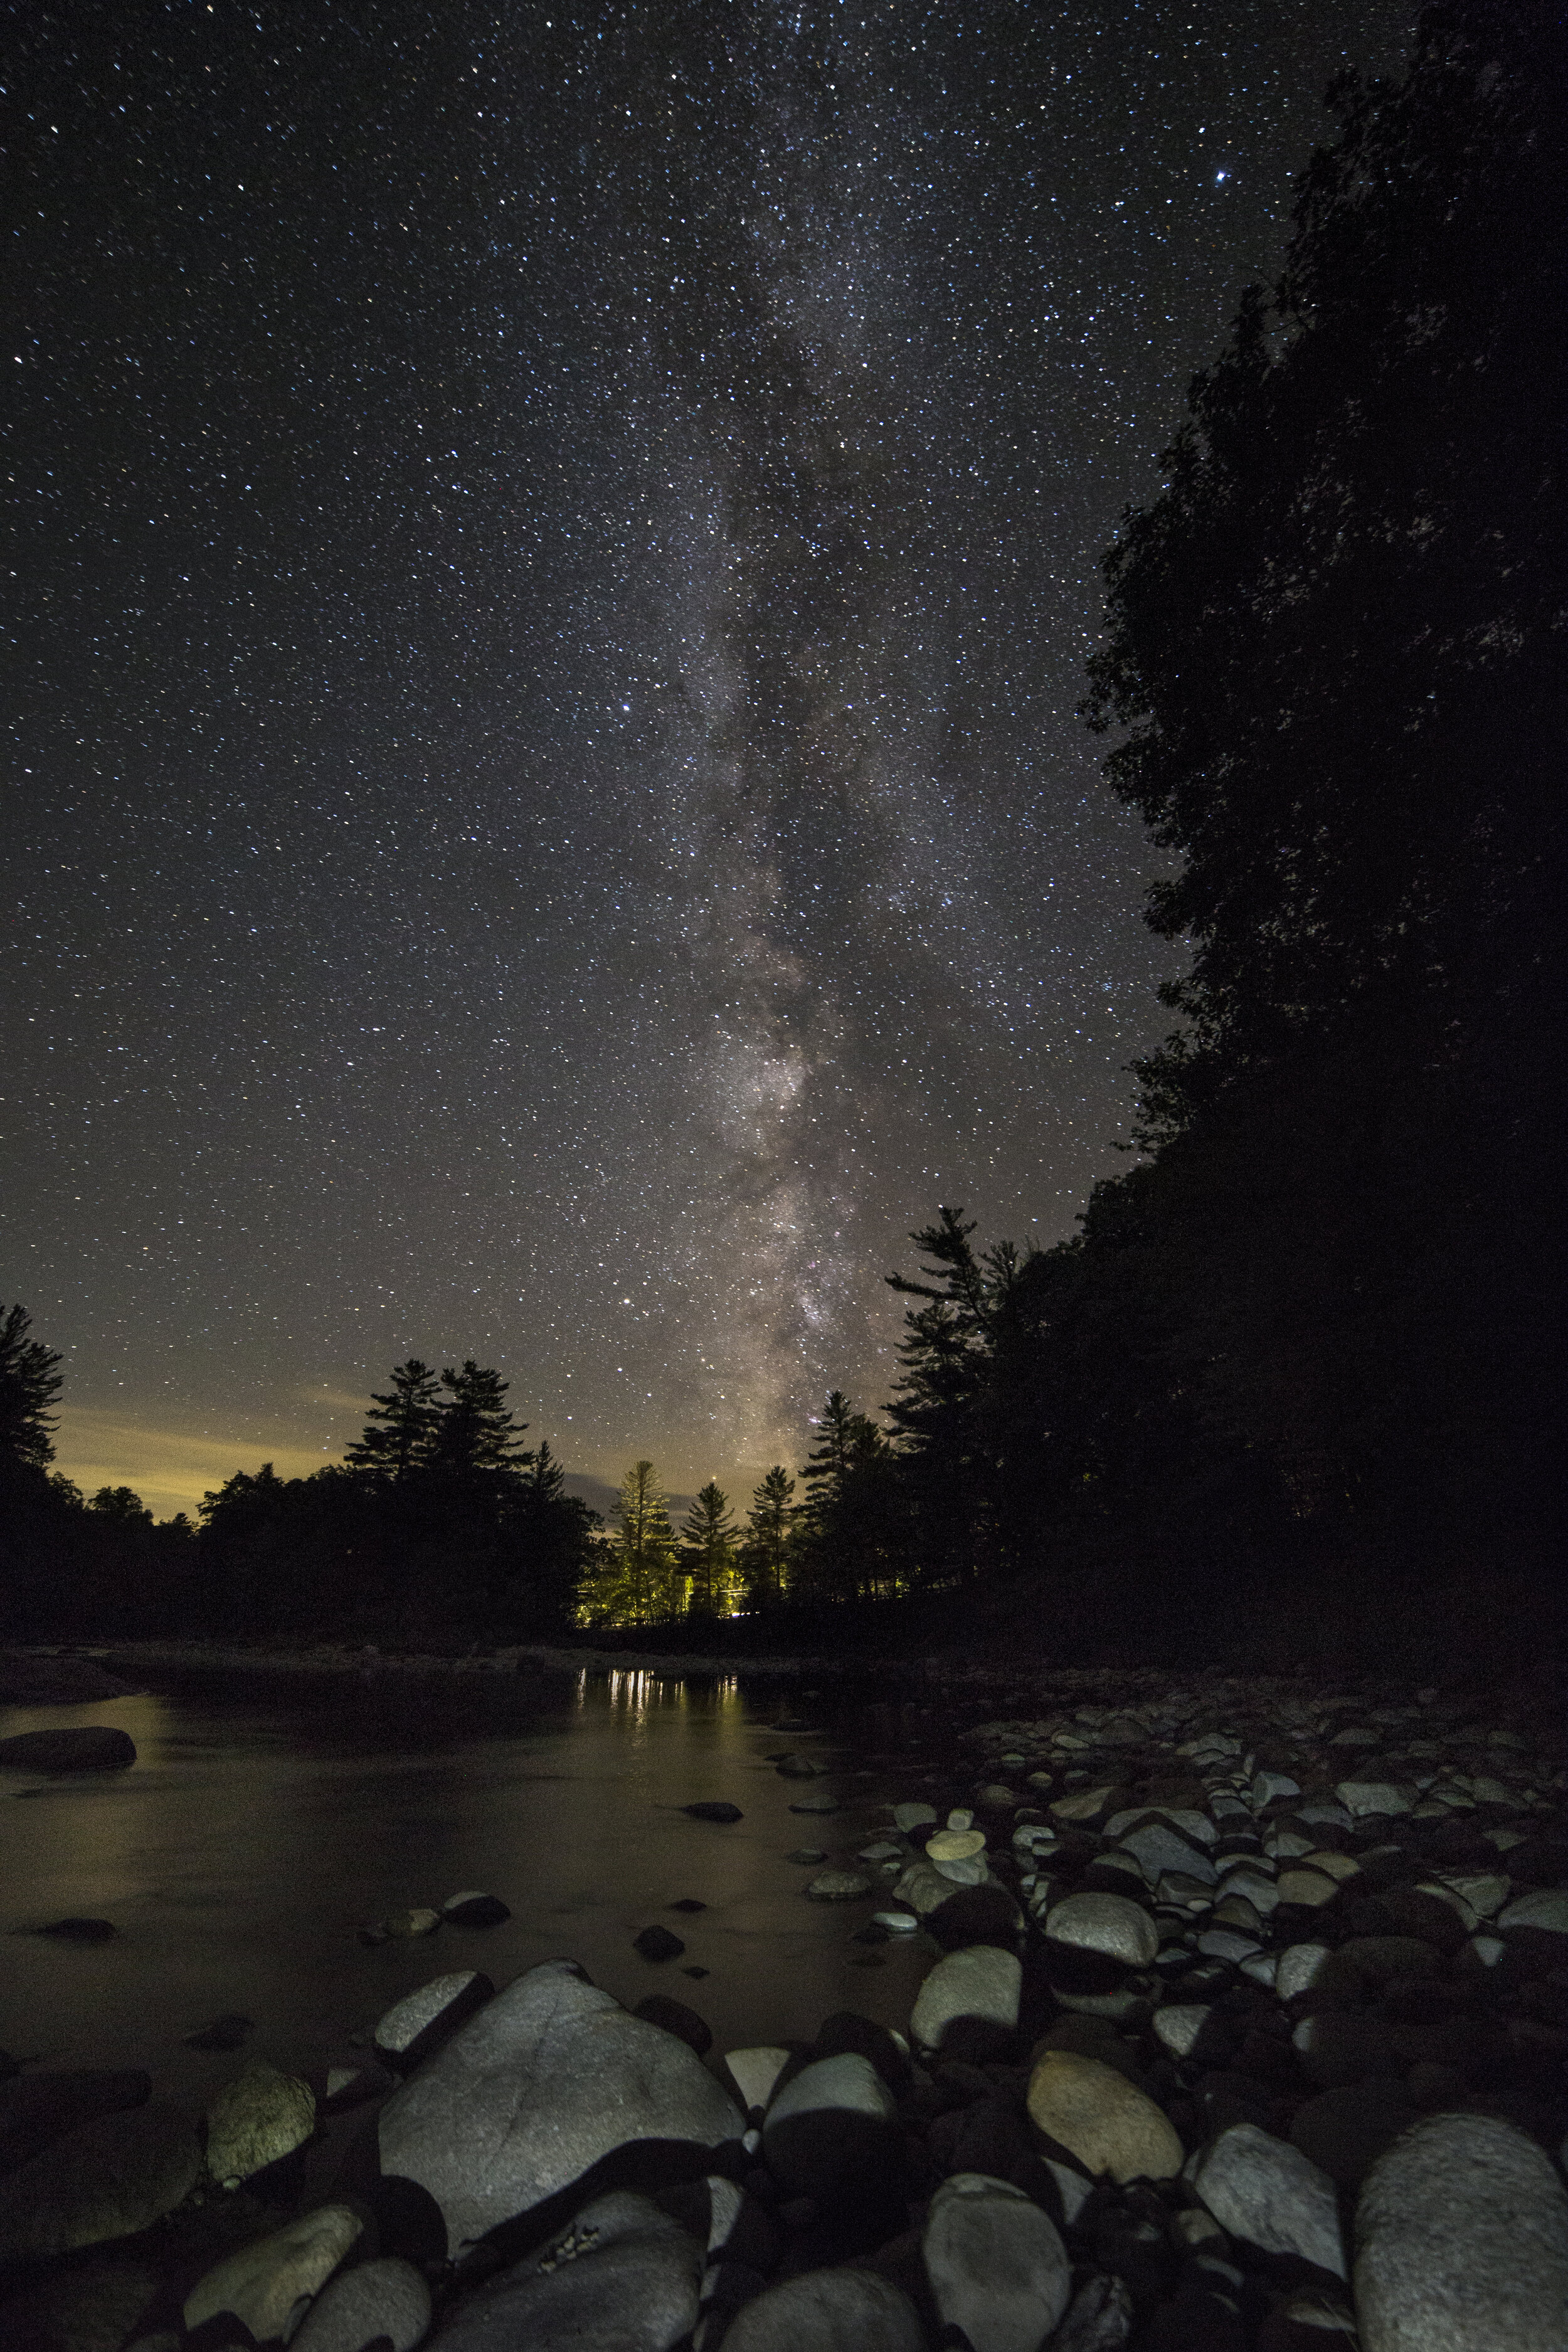
Confluence of Rivers, © John Meader, 2019

Confluence of Rivers (b&w), © John Meader, 2019
Along the Edges, © John Meader, 2019

Acadia Night Sky Festival, © John Meader, 2017
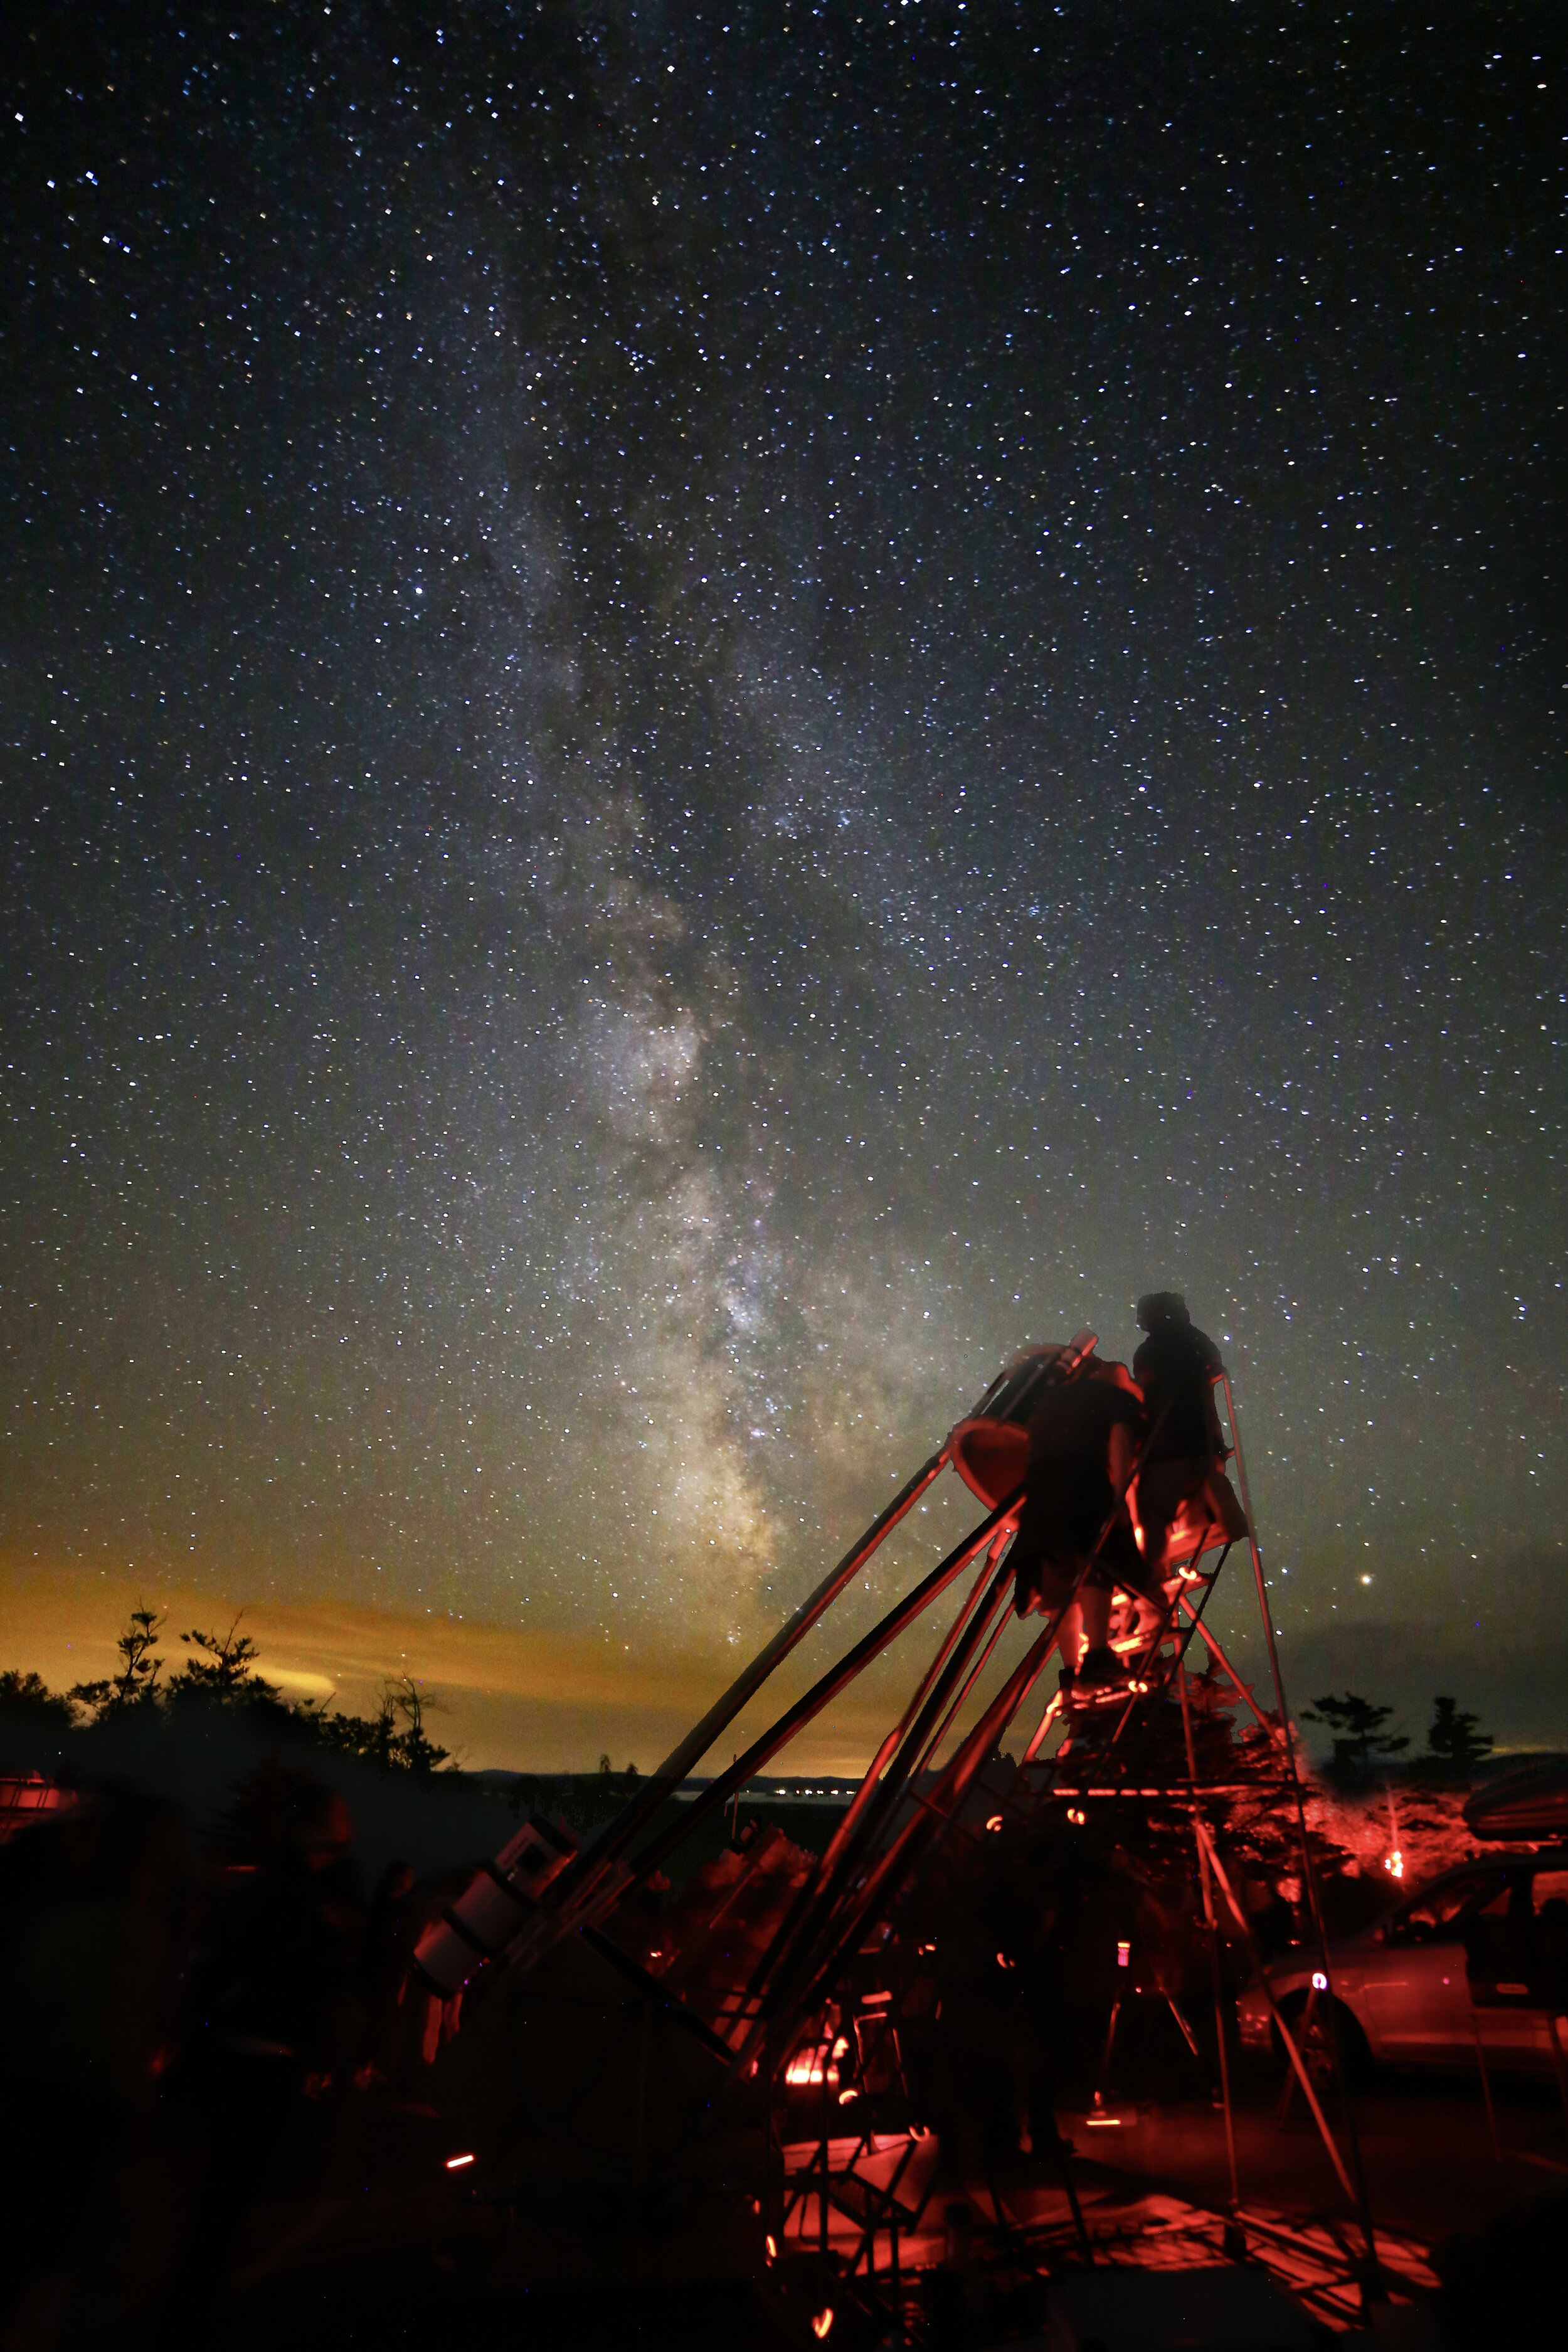
Big Scope, © John Meader, 2017

Cape Gaspé Light, © John Meader, 2015

Reflection at Cape Gaspé, © John Meader, 2015

Lake Hebron, Monson, Maine © John Meader, 2021

Three Friends, Schoodic Point, © John Meader, 2014
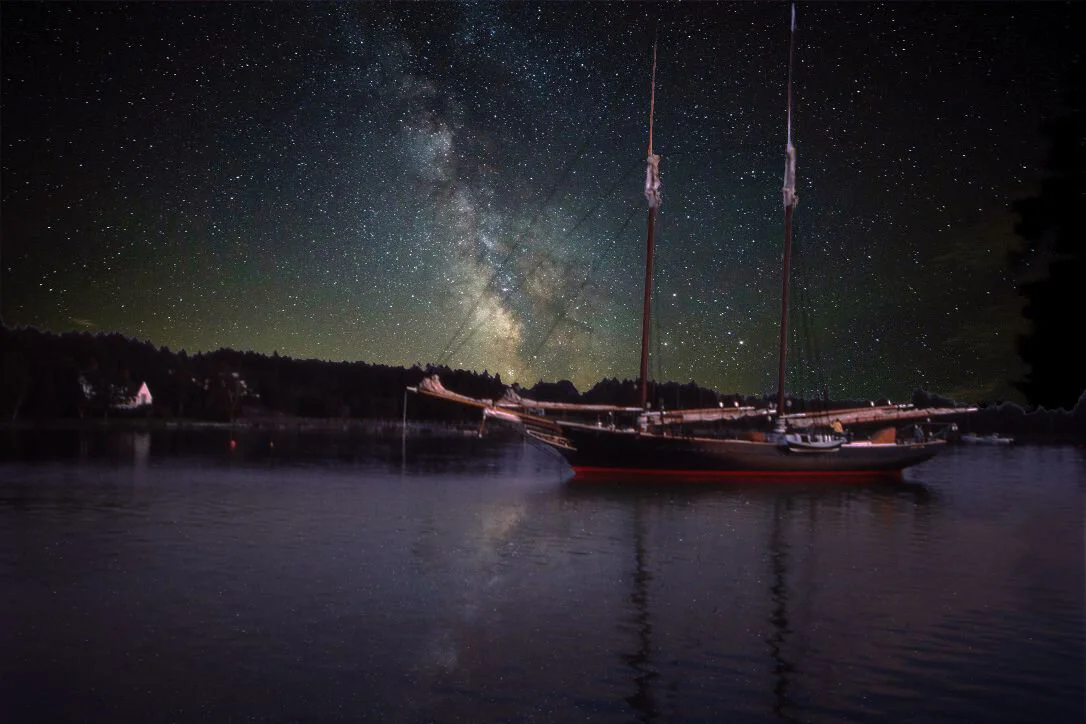
A Mary Day Composite, (a composite of two photographs-the schooner and the Milky Way), © John Meader, 2020

A Timberwind Composite, (a composite of two photographs-the schooner and the Milky Way), © John Meader, 2020
Schoodic Spruces and Milky Way, © John Meader, 2015

Boulder Beach, Acadia, © John Meader, 2016

Humshaugh Chapel #1, © John Meader, 2018

Humshaugh Chapel and Milky Way #2, © John Meader, 2018
Dreams of a Voyage, © John Meader, 2014

Exploring the Milky Way in the Northeast, Glendo, Wyoming, © John Meader, 2017
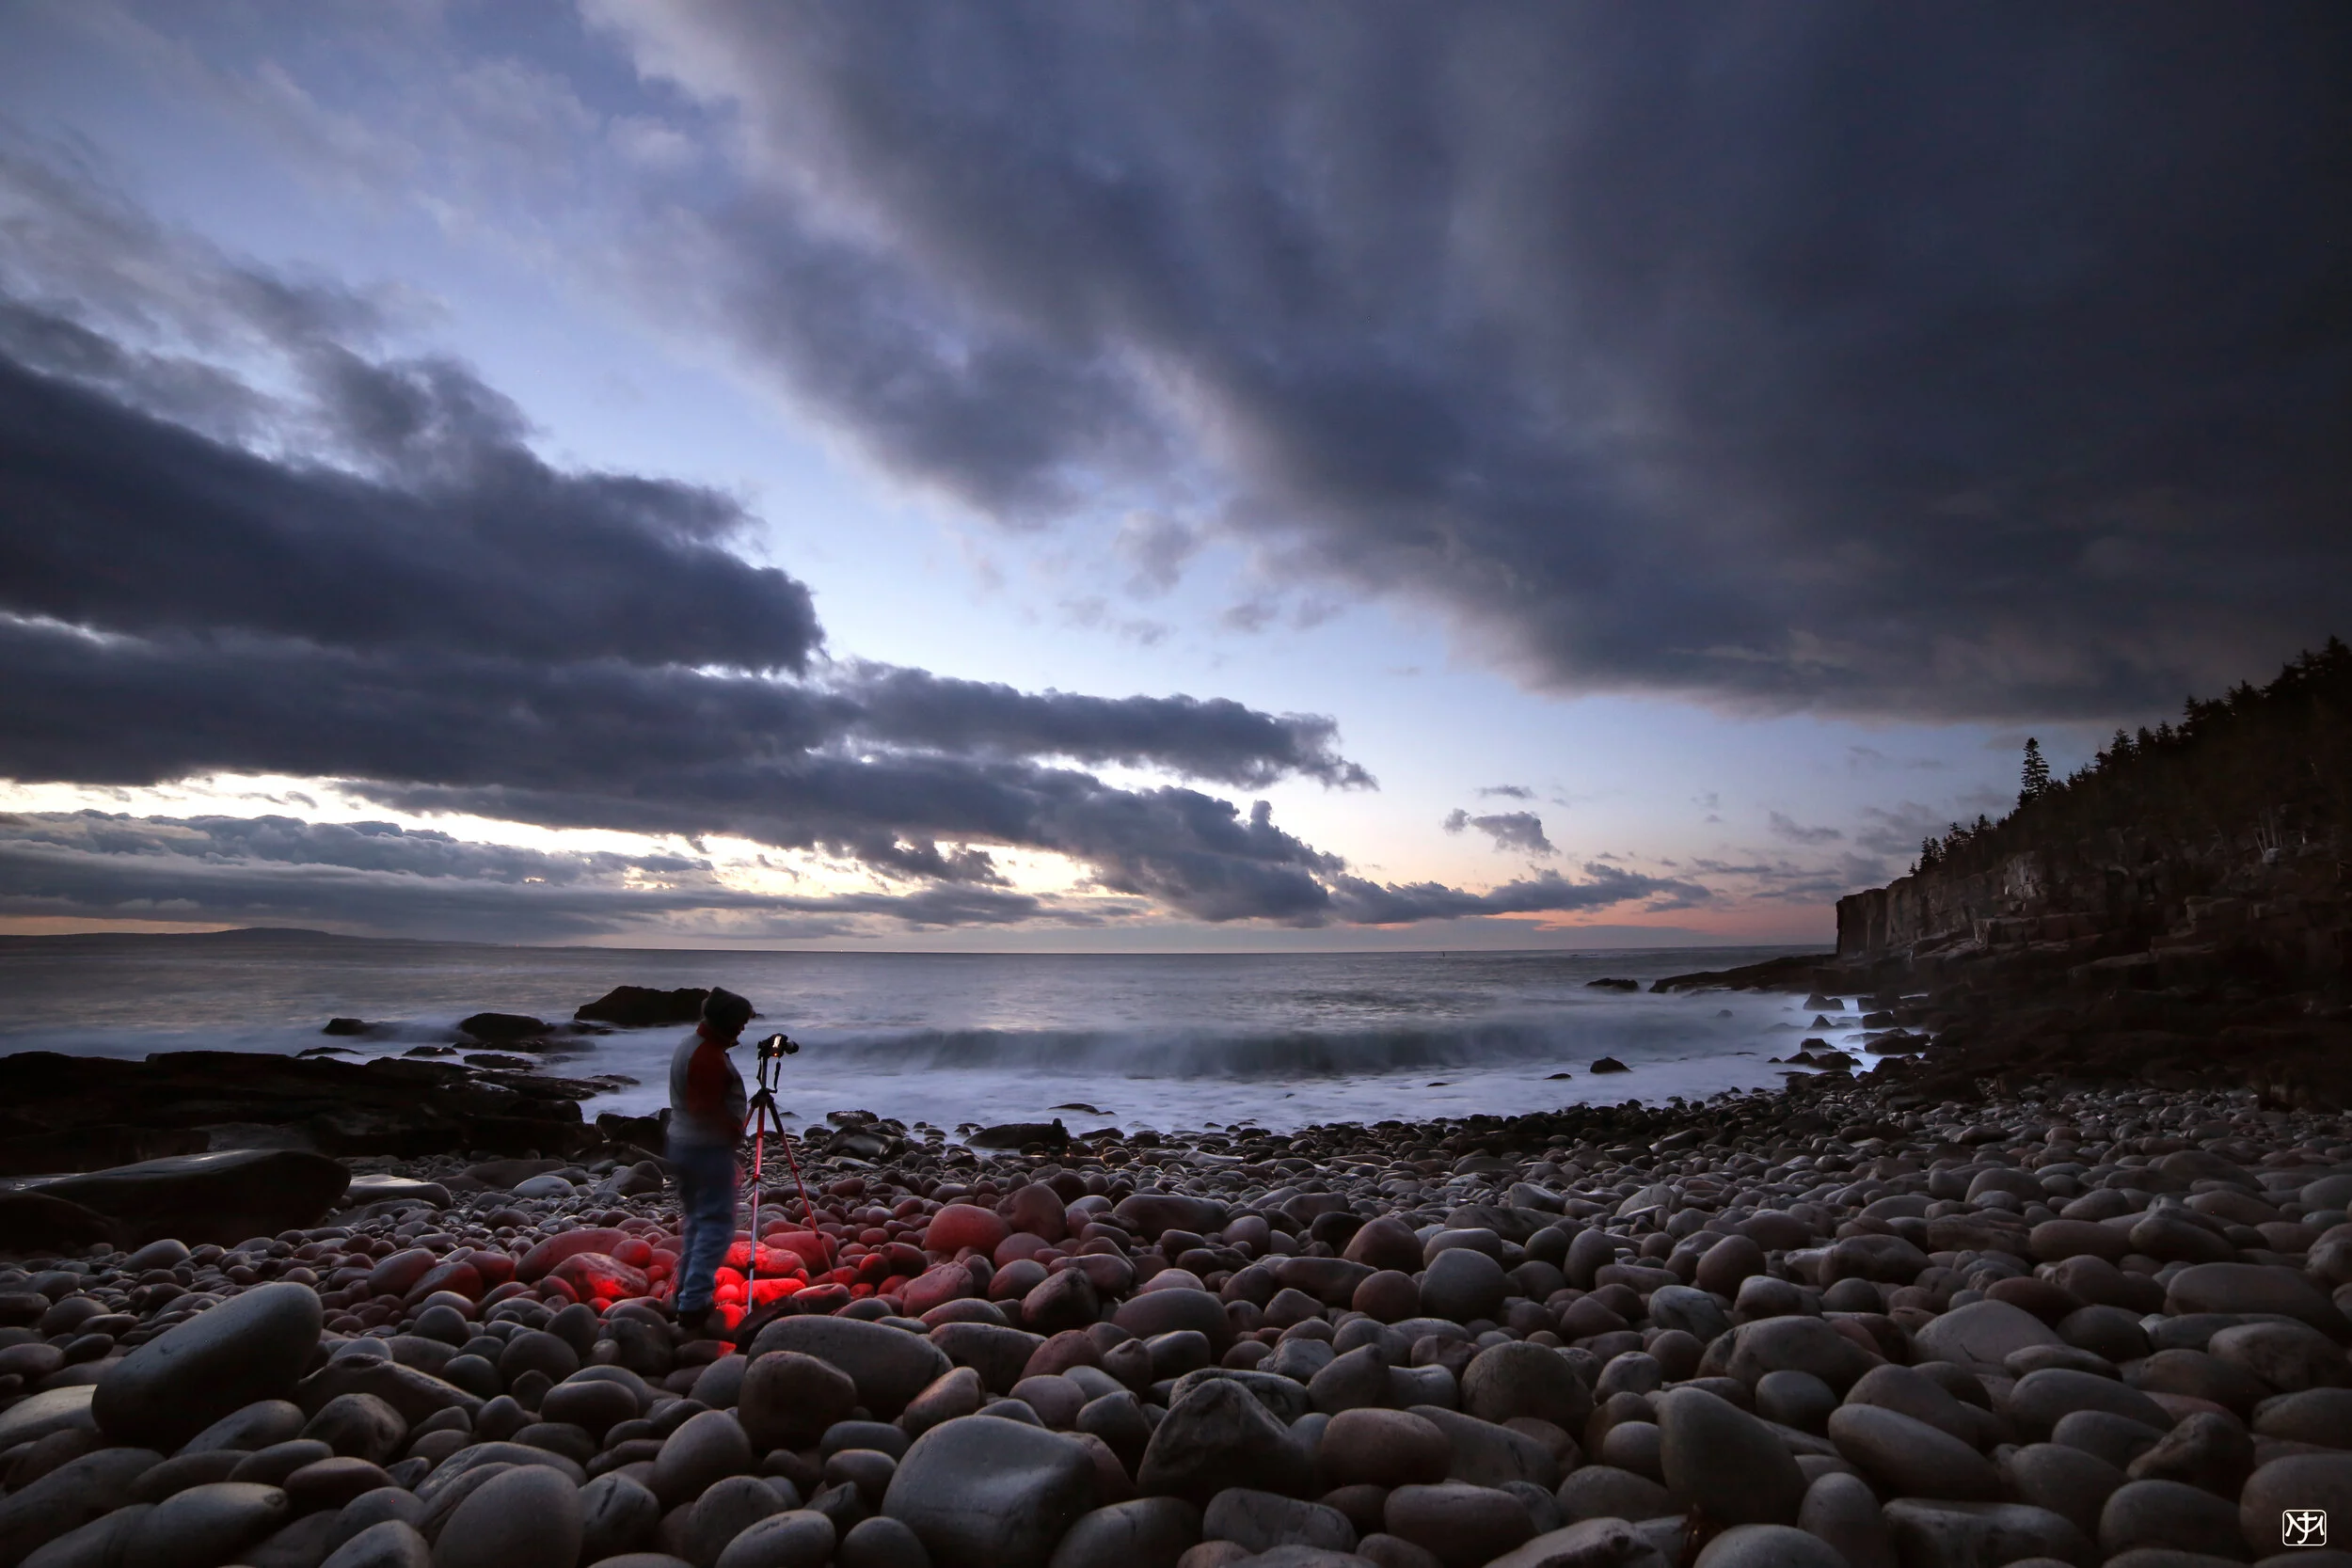
4. The Cloudy Nights
It doesn’t always go so well. Sometimes the weather changes, the clouds come in, or the humidity or something ruins the sky. Bummer, right? Yeah, there’s a level of that, but if you’re an optimistic photographer, you learn to look for what you can see. Here are a few shots from those nights when we went in search of the Milky Way, but for various reasons it was not to be, but with a change in mental focus, they were still great nights to be out.

Clouds at Boulder Beach, Acadia, © John Meader, 2016

Stars and Clouds at the Wire Bridge, © John Meader, 2019

Ghost on the Bridge, © John Meader, 2019

Mount Vernon Church by the lake, © John Meader, 2020

Phantom of the Lake, © John Meader, 2020

The Night of the Surry Star Party, © John Meader, 2017

Wind and Clouds on Flagstaff, © John Meader, 2017
Clouds make better Sunrises, © John Meader, 2016

A Night Selfie, © John Meader, 2013

Clearing Sky at Dawn, Otter Cliff, © John Meader, 2016
5. The Technical Side
To shoot in the dark requires a few necessary pieces of equipment, and a bit of technical expertise.
Equipment

Camera. This seems obvious, but you need a camera that captures images well in low light. Modern cameras are much better at this than they were even just a few years ago. For a while this was strictly the domain of DSLR cameras, but with the development of mirrorless cameras that has changed. Today, people are also doing surprisingly well even with cell phones. My experience is completely with DSLR cameras, so that’s what I’ll be talking about, though most of this also applies toward mirrorless cameras as well.
Wide Angle Lens. For Milky Way photography a wide angle lens has great advantages. First, the Milky Way is a large extended sky object so you need the wide angle point of view to capture as much of it in your frame as possible. Second, the wider the angle, the longer your exposure can be before you start to capture star trails. Star trails are the stars apparent motion across the sky due to Earth’s rotation. I usually shoot with a 14mm lens.
The rule of 500 states if you divide 500 by the focal length of your lens it will give you the length of exposure in seconds you can shoot before the stars start to trail and become elongated. If you shoot with a 50mm lens, then 500/50=10 seconds. If you shoot with a 14mm lens, then 500/14= 35.7 seconds. Since I usually shoot with a 14mm lens and my camera’s longest pre-timed exposure is 30 seconds, I seldom shoot longer than that.
Lens Speed. A faster lens with a low f/stop will give you the most light, which you need because you’re shooting in the dark. The lower the f/ratio, the bigger the aperture, which means more light. My 14mm lens wide open is f/2.8.
Tripod. Regardless what type of camera you’re shooting with, a solid tripod is very important. Get something that can handle the weight of your particular camera. There’s always a give and take between light-weight travel tripods and heavy-duty more solid tripods. If you get serious, you’ll end up with both. Shooting the night sky is always served well by the heavier duty tripods. Weight adds to stability, this is important as these types of shots often involve 15-30 second exposures.
Ball Head and/or Gear Head. This is the interface between the tripod and your camera. It’s what allows you to point your camera in different directions and lock it solidly in place. A ball head is just that, your camera attaches to a metal ball within a framework that holds it in place once you’ve moved it to the spot you want to point your camera at. A good ball head can cost as much (sometimes more) than your tripod. An inexpensive ball head will let your camera sag down when you tighten it so it isn’t pointed exactly where you wanted it to be — a very frustrating thing when you thought you had your camera all framed up, only to have it sag down due to its own weight. A good ball head won’t do that.
A Gear Head does the same thing, but with three geared axes and you can do fine adjustments with no sag. I use a combination of both—a good ball head attached to the top of my gear head. You don’t need both, I just like the combination.
A Clock Drive is a more advanced piece of gear. This is a tracking device that mounts on top of your tripod, and when properly aligned with the polar axis of Earth, will track your camera to counter Earth’s rotation allowing longer exposures without star trails. It does away with the 500 rule, but it must be exactly aligned with Earth’s polar axis.
Remote Shutter Control. When you’re shooting long exposures, even a simple light touch upon the camera will create a shake which will create wiggly stars, so you need to be able to trigger the shutter without touching your camera. You can use the delay feature on the camera where you press the camera’s shutter button and the camera waits a predetermined number of seconds before the shutter opens, allowing time for the vibrations created by pressing the shutter button to subside. Many photographers, myself included, prefer a remote control so you don’t have to touch the camera at all.
An intervalometer is a fancy remote control that allows you to take multiple exposures with a short gap between each exposure. This can be used for creating time-lapses or for stacking multiple exposures. Stacking can bring out extra detail and effectively created a longer exposure from a series of shorter exposures. It is probably the best way to create star trail shots. For example, to create a decent star trail shot showing the movement of stars about Polaris, the North Star, you might set your intervalometer to take 20 second exposures, 1 second apart, continuously for an hour or more, that would result in over 100 exposures, then all those exposures would be combined to make one photograph. Another feature of an intervalometer is that you can set exposure lengths greater than 30 seconds. High end cameras often have intervalometers built in.
Spare Batteries Have several, and if the wether is cold, keep them warm next to your body.
Red Flashlight. A flashlight is a useful tool in the dark so that you don’t leave anything behind in the end, but sometimes you may need to search for things in your camera bag or look at a star chart while you’re working around your camera. The red light will have the least amount of negative effect upon your eye’s dark adaptation, but don’t use even the red light during your exposure unless you want something lit up red!
White Light Flashlight or LED Lights. These lights are used to light up your foreground during an exposure. This brings out the foreground, otherwise you’ll end up with black silhouettes which can be nice too. It’s nice to experiment with both, no lights and lights. How much light it takes to illuminate the foreground takes experimentation, things closer need less light, more distant foreground objects may need more light to show up the way you want. Experiment and see what you get, that’s part of the fun!
Warm clothes, Shoes, Gloves. In the winter it’s obviously cold, but doing photography is a colder activity than cross country skiing or snowshoeing because it’s not aerobic, it’s a lot of standing around. You’ll want more warm layers than you would if you were doing something more active. Warm pack boots or mukluks are good in winter. I like gloves where I can uncover just my fingers to work the camera. Hand and toe warmers are highly recommended for winter shooting.
Bug Repellant. In warm weather you might want bug repellant. DEET works best, but be careful not to get DEET on your camera gear or lenses, it can deteriorate lens coatings and can dissolve some plastics.
Photo Processing Software. This is used when you get home to process your photos. Preferred software would be Adobe Photoshop, Lightroom, or Photoshop Elements.
Technique
Okay, now you’ve got the gear, you’re out in some beautiful location in the middle of the night, the stars are brilliant overhead, the camera’s mounted on a fancy ball-head atop a rock solid tripod. What do you do now?
Set your camera to M. That’s the manual setting.
Turn on Mirror Lock Up if you’re using a DSLR camera. Now when the shutter button is pressed, the mirror will goes up, then a second or two elapses before the shutter opens. This allows the vibration of the mirror motion to subside.
Set your camera’s file format to RAW.
Set your aperture to wide open, for my 14mm lens that’s f/2.8 for example.
Set your shutter speed to a long exposure, say 20 or 30 seconds.
Set your ISO to something high, anywhere from 1000 to 3200 to perhaps even 4000. Experiment. Remember, the higher the number the more sensitive the sensor is to light, but the higher the noise (grain).
Turn off lens stabilization. Stabilization works great for handheld photography, but on a tripod there’s no motion and the stabilization will look for motion and in the process of looking for motion it creates it.
Turn off auto-focus. You’ll need to manually focus, we’ll talk about that soon. There’s not enough light for auto-focus to work.
Set your shutter to the Remote Control setting. Turn on your remote or intervalometer. Attach the intervalometer interface if your remote and camera require one.
Take off the UV filter on your lens. UV filters are great for protecting your lens and they don’t cause a problem in bright light, but in dim light they can cause faint reflections that will show up in the photos as slightly offset ghost images.
Remove or tie off your shoulder strap so that it doesn’t blow in the wind, wiggling your camera and ruining your exposure.
Focus. You probably won’t see much through your DSLR viewfinder except the brightest stars. Point your camera at the brightest star you can see. Turn on Live View, center the bright star in the camera’s LCD screen, then increase the magnification as much as possible keeping the star within the live view. Now manually focus the star by making its image is as small as possible. Note the spot on the lens focus ring, that will be your focus for that night. Since most lenses can focus past infinity, you shouldn’t trust the infinity mark as the proper focus, it might be the correct focus, it might not. Also, the spot where the focus is correct on one night might not be the spot on another evening with different temperatures. Do this focusing procedure each night to get the proper focus.
Point the camera at your target, level it as best you can. Tighten it down with your ball head. Let your companions know you’re about to expose so they don’t turn on unwanted lights. Check to make sure there are no airplanes or satellites traversing your field of view.
Take your first exposure. When it’s done, look at it on the camera’s LCD screen and make adjustments to the exposure settings (exposure time, ISO, aperture) to get closer to what you want in your next exposure. If you’re light painting the foreground with a flashlight, determine whether you had too much or too little light. Adjust accordingly. If the horizon is not level, adjust it. Then shoot again.
Remember, to watch your footing in the dark, especially if the ground is uneven or you’re near a cliff. You also don’t want to fall or accidentally kick your tripod. Watch for critters too. We spent an evening at Cape Gaspé in Quebéc shooting the Milky Way with two large porcupines wandering around on the ground near us the whole time we were there.
Repeat. Breathe. Have fun.
Process your photos at home with Lightroom or Photoshop. Always start with making a duplicate of the original so in case you ruin it, you haven’t ruined the original. Never work on the original. Adjust you color balance. Experiment with brightness, contrast, clarity, vibrance, and saturation. If you know how to use masks, they will allow you to work specific parts of the image without affecting other parts. Play with your image, don’t be afraid to experiment, you’re working with a duplicate so it’s okay to make mistakes. Remember, there’s always the Command-Z undo button.
6. A Second Critique:
My First Shot Reinterpreted
What can you do with Photoshop? What should you do with Photoshop? It’s powerful software which is the modern equivalent of a darkroom. Dodging and burning, adjusting brightness and contrast, and much more can be accomplished. You can combine photos, and create new composite images. For example, without going to Colby to reshoot my first Milky Way again—I may still do that—I reworked the original with stronger Photoshop skills than I had in 2013. I extended Johnson Pond. I grabbed another image of Miller Tower and super-imposed it over the blown-out tower, then blended them together. Then I grabbed the Milky Way from one of the better photos shown above and replaced the original sky. I added a hint of sky reflection to the pond. I desaturated the green of the lawn. Then with some masking, and blending, adjusting contrasts, along with a healthy dose of just experimenting and playing around, I came up with this image. It is a composite image made from other images, yet as artificial as it sounds, this is much closer to what I saw that night in 2013 as I stood beside my camera and took that original shot. So does that make it less real than the original?